We’ve put together a special STOS Coders Edition of Mouth Trap for you to play in a browser.
The game features the first 25 levels of the full version and has some specially created graphics and music that you may recognise from the original Atari ST game.
You can play the online version through your browser by following this link.
So far we have tested Edge & Chrome on PC and Safari on an iPhone. Please let us know if you have any problems playing in your favourite browser, and we will try to fix them where possible. Just a reminder that some browsers will not play sound unless you click in to them first, so make sure you do that to enjoy Mouth Trap fully.
The full version of the game is available on PC and Mac through the Steam Store.
About Mouth Trap
The biggest mouth in the land has been let loose in the largest food orchard on the planet! Crazed and hungry for food, you must chomp your way through over 100 levels of gut-busting fun!
Your huge chompers, however, are susceptible to germs, and you must steer clear of them. Otherwise, your nice gnashers will become decayed and fall out. When you have no gnashers left, it will be a gummy game over.
So, get ready to stuff your face with good food like bananas, oranges, pizza, and burgers to become a champion chomper!
Features
Over 100 Levels of Arcade Action
Collectible Treats to Help (or Hinder)
Support for Keyboard or Controller
High Score Table for Champion Chompers
Music & Sound FX control
Fun Soundtrack
Mouth Trap is a retro-style arcade game where your aim is to eat as much food in the orchard as you can. But watch out for those pesky germs that get in your way, and decay your massive gnashers! Lots of treats can help (or hinder) you in your mission to complete over 100 levels of fun. Can you become a “Champion Chomper”?
Welcome to part two of episode eight of our Let’s Remake Manic Miner series. In this episode, we are going to add to the work that we did previously, and create the collision logic for Miner Willy and the cavern floors and walls.
If you haven’t already checked out part 1 of Episode 8, make sure you read through it to understand some of the code that we have in place.
Using the Collision Map
In the previous part of episode 8, we created our collision tile map. We did this by simplifying the world that Miner Willy is part of. As a result, we created the map array to hold the different tiles and their positions within the world. We are now going to start using the map array to allow us to stop Willy doing things he shouldn’t. But first of all we need to make sure that Miner Willy should always be doing, and that is falling.
All Fall Down
Put on your luminous socks, slap on some cheesy 80s music, and listen to some 5*Star while we do the next bit!
The first collision we are going to do is with the floor, but before we can start to do that, we need to make sure that Miner Willy is falling. After all, he can’t hit the floor unless he’s moving towards it. If you remember from a previous episode, we limited the Y position for Willy within the @ApplyGravity function. So, we need to remove that limitation to make sure that Willy heads towards the ground.
Find the line that reads…
if MWYPOS > 80 then MWYPOS = 80
…and delete it.
If we run our code now, Miner Willy will simply fall off the bottom of our screen. If you’ve copied the code from the previous episodes, Willy is actually out of the bounds of the cavern, so before we start to check against the floor, let’s sort that out. To make our levels more flexible, let’s store Miner Willy’s starting coordinates within the level data that we’ve created.
Add the following pieces of data to the bottom of the level data…
...
data 01,00,00,00,00,00,00,00,00,00,00,00,05,00,00,00,00,00,00,00,01,01,01,03,03,03,03,03,02,02,02,01
data 01,00,00,00,00,02,02,02,02,02,02,02,02,02,02,02,02,02,02,02,00,00,00,00,00,00,00,00,00,00,00,01
data 01,00,00,00,00,00,00,00,00,00,00,00,00,00,00,00,00,00,00,00,00,00,00,00,00,00,00,00,00,00,00,01
data 01,02,02,02,02,02,02,02,02,02,02,02,02,02,02,02,02,02,02,02,02,02,02,02,02,02,02,02,02,02,02,01
data 48,80
We will use these two values for Miner Willy’s starting X position and Y position for the level. We will need to read these in when we initialise the level data, so lets do that now by adding an additional read statement within the @InitLevel function. We will use variables MWSXPOS and MWSYPOS for those values.
@InitLevel
    restore
    read LVLNAME$

    for t = 0 to 511
        read TNO
        map(t) = TNO
    next t

    read MWSXPOS, MWSYPOS

    LVL$ = str$(LVL) - " " : if len(LVL$) = 1 then LVL$ = "0" + LVL$
We then need to change our @InitMinerWilly function to use these values when Willy is initialised at the start of each level. This is straight forward as we already have our MWXPOS and MWYPOS variables that we are using, and previously we hard coded the values when Willy was reset. We simply need to change the hard coded values to use our new variables.
@InitMinerWilly
    FALLING = 1 : JUMPING = 2
    dim mwan(319) : for xpos=0 to 319 : mwan(xpos) = 1 + ((xpos mod 8)/2) : next xpos
    dim jmps(359) : for ang = 0 to 359 : jmps(ang) = -(sin(rad(ang))*20) : next ang
    MWD = 0 : MWWS = 1 : MWWC = 2 : MWWCC = MWWC : MWXPOS = MWSXPOS : MWYPOS = MWSYPOS : MWSTATE = FALLING : MWJMPANG = 0 : MWVSPD = 1
    gosub @SetOFS
    return
Ok, so if we run our game now, we will see that Willy is now within the bounds of the cavern, and as we expect, he falls straight through the floor. So, how do we stop him from doing that?
Stop Right Now, Thank You Very Much!
We’ll move to 1997 for the next bit of music whilst we read – or maybe you’ll get distracted and just watch the video instead. For those that watched the video, welcome back!
So, how do we stop Miner Willy from falling? Well, it’s really quite simple. You’ll recall we have a variable called MWVSPD this is the vertical speed that Willy is heading, so all we need to do is manipulate that value before we apply gravity to him.
In our @DisplayMinerWilly function, you’ll see that we already decided that if Willy is falling that we will reset the MWVSPD variable to one.
And, because it’s within the @ApplyGravity function where we manipulate Miner Willy’s real Y position, we know that we can fiddle with the speed and it will then be reset each frame, ready for the next check – happy days!
So, let’s start to do some checking of what is below Willy. Let’s introduce a new function called @CDetection and add it to our @DisplayMinerWilly function.
@DisplayMinerWilly

    gosub @ApplyGravity
    if MWSTATE = FALLING then MWVSPD = 1 : A = MWYPOS : else MWVSPD = 0 : A = MWYPOS + jmps(MWJMPANG) : MWJMPANG = MWJMPANG + 2 : MWSTATE = JUMPING : if MWJMPANG > 180 then gosub @ResetJump
    if MWD = 0 then MWXPOS = MWXPOS + MWSPD : else MWXPOS = MWXPOS - MWSPD
    gosub @CDetection
    sprite 1,MWXPOS,A,mwan(MWXPOS) + MWOFS
    return
@CDetection
    return
We’ve simply done a straight return there, but we’ll add to this in a second. Before we do, let’s discuss how we can speed up our collision calculations.
Whenever we’re working with calculations, whether simple like collisions, or more complex, the aim is to always reduce the number of calculations you are doing. When doing something like collisions, the calculations are pretty easy, but the thing to remember is that once a collision has happened, we know what the outcome should be; therefore, we do not need to process all the other calculations; it’s just a waste of CPU time.
We can handle this with a simple boolean variable which we can set at the start of our @CDetection function. We will call it CDETECTED, and we will set it to false.
@CDetection
    CDETECTED = false
    return
Our main detection routines can set this flag (as required) once they have encountered a collision, and we can then skip other collision calculations, thus saving CPU time each frame. Not rocket science, I know, but useful all the same.
We’ll introduce a new function for checking below Miner Willy, so let’s add that in now and call it in our @CDetection function. We only want to call the check below Miner Willy when he is heading downwards. We can identify that by checking if his state is FALLING, but, if he’s jumping, we need to only check when he has reached the peak of his jump parabola (if the angle is > 90 degrees, then he’s heading downwards). This enforces that once you’ve jumped, you’re going up regardless!
@CDetection
    CDETECTED = false
    if (MWSTATE = FALLING) or (MWJMPANG > 90) then gosub @CheckBelowMinerWilly
    return

@CheckBelowMinerWilly
    return
In fact, let’s add all the other directions too: above, left, and right.
@CDetection
    CDETECTED = false
    if (MWSTATE = FALLING) or (MWJMPANG > 90) then gosub @CheckBelowMinerWilly
    if not(CDETECTED) then gosub @CheckAboveMinerWilly
    if not(CDETECTED) then gosub @CheckLeftMinerWilly
    if not(CDETECTED) then gosub @CheckRightMinerWilly
    return

@CheckBelowMinerWilly
    return

@CheckAboveMinerWilly
    return

@CheckLeftMinerWilly
    return

@CheckRightMinerWilly
    return
Notice how we are now starting to use the CDETECTED variable. This is where we may have already encountered a collision and are therefore skipping the other calculations because they are not necessary.
We’ve now got the core structure for our collision detection routines in play. We can now add the collision code itself. We’ll check below Willy first of all, but how do we do that? Well, we use the collision map that we have in the map array. We can translate an X & Y Position on the screen, and grab the tile number from that position. We can then calculate what we need to do based on that read value – quite simple, really.
Remember those pesky hotspots that we talked about in the previous part? That’s where they would normally come in to play, however, we are going to do something a little different. One of the main features of the Manic Miner game is the pixel-perfect jumps that have to be done. If we were using a single hotspot, that would break that concept. Our hotspot is in the top left corner of Miner Willy. What we are going to do is check 3 different positions of Willy: bottom left, bottom middle, and bottom right. We’ll do this by creating three variables and grabbing the tile number at those three positions.
Neil’s Handy Hint: What I found useful while writing this text is to introduce some joystick control on the vertical axis of Miner Willy. That helps with determining the calculation positions and displaying the tile information for debugging purposes, should you need it. You could also plot some pixels in a different colour to help determine where your collision points are.
Remember that the above calculations are going to be pixel-based, so we need to convert these into an offset that is relative to our map array. We need to do a little bit of mathematics for that to happen, and the calculation is as follows:
(XPOS – 32) / 8
Firstly, we need to take a value of 32 from the calculated X position that we want to check. This is to account for the fact that the tile map array does not start at pixel position 0. We then divide that value by 8 to convert it to 8 character blocks. In the case of the Y position, we do the same, but then multiply out the result by 32 to cater for the 32 tiles per line.
As we are going to be using the left, middle and right values in all our calculations, let’s add the calculations to our main @CDetection function so that it executes just once and we don’t have to be repeating the same calculations all the time and consuming CPU.
@CDetection
    CDETECTED = false
    MWL = MWXPOS-32 : ror 3,MWL : MWL = MWL and %00011111
    MWM = MWXPOS-28 : ror 3,MWM : MWM = MWM and %00011111
    MWR = MWXPOS-24 : ror 3,MWR : MWR = MWR and %00011111
    MWT = A : ror 3,MWT : MWT = MWT and %00001111 : rol 5,MWT
    MWB = A+16 : ror 3,MWB : MWB = MWB and %00001111 : rol 5,MWB

    if (MWSTATE = FALLING) or (MWJMPANG > 90) then gosub @CheckBelowMinerWilly
    if not(CDETECTED) then gosub @CheckAboveMinerWilly
    if not(CDETECTED) then gosub @CheckLeftMinerWilly
    if not(CDETECTED) then gosub @CheckRightMinerWilly
    return
Erm?? What the [insert expletive here] is going on there then? Well, dividing and multiplying in STOS is very very slow. So because we are working off nice round numbers, we can do super quick divides and multiplications using the ROR and ROL.
ROR means “rotate right”. In other words, get the binary representation of a number and rotate all the bits right by x positions. Because this is a rotation, any bits that fall off the right-hand side then reappear on the left-hand side. If we were working in assembly, we would “shift” instead of rotating; in a shift operation, values that fall off the right-hand side do not appear on the left-hand side. As an example, let’s pretend we are working with the number 15, and we are working within a byte (an 8-bit number). That value is represented as such in binary: %00001111. If we rotate that value by 2, the resulting binary representation is %11000011. As you can see, the two bits at the far right of the value are now at the beginning of the number. The rightmost bits of a binary number are called the least significant bits, and the leftmost bits are called the most significant bits.
So working on the above, if we rotate a number by 3 bits, we actually divide it by 32. Or do we? Well, no, we don’t. As we have seen in the example above, the value of 15 rotated right by two bits actually results in a value of 49155. Try this small program to show that.
As you can see, STOS is working with 16-bit numbers by default, and because we have rotated, our two least significant bits have now become our two most significant bits. This is why we then use the and command. What that does is a logical and on the result to mask off the values that we don’t want. In other words, we want to keep the four least significant bits, which then results in a value between 0 and 31; an 8-bit value of %11001111 therefore becomes %00001111.
The calculation for the Y position is the same. However, once we have divided our value by 8, we then multiply it by 32. This is the same technique, but to multiply, we rotate the value to the left instead. Note how in the code above, we are using the A variable. This is so we can take into account the jump parabola, with A being a relative offset from the Y position that the jump began.
Hey presto, we’ve got some good maths going on there, and using some nifty techniques, we’ve really removed a lot of processor consumption by STOS. I hope that all makes sense!
See page 220 of your STOS manual for more detailed information on what these commands do, but don’t pay too much attention to it because it misses a huge point, which is why we also have to use the and command above.
Grabbing the Tile
Thanks to all the maths that we are doing above, the values that are held in the MWx variables represent the different offsets that can be used to read the tile number from our map array. Let’s add that to our @CheckBelowMinerWilly routine so that we can start to do stuff based on the tiles below him. I’ve added a couple of prints there too, so we can see what is going on below Willy. We will remove those eventually.
Ok, if we run this code now, we should be able to see what the tile number is below Willy’s left, middle, and right. Once we’re happy with that, we can then put the logic in to check the collision based on the tile number. In this instance, we want to check for tile number 2 (a solid floor), and if we find a tile we stop him from falling. Add the following code:
So, if the tile below (left, middle, or right) is two, then we set Willy’s speed to be zero (ie, stop him from falling), and we flag that a collision has been detected. Finally, we set Willy’s Y position to be equal to A, which takes into account any relevant offset for a jump, and we then make sure that if Willy was jumping, that the jump is reset.
And there we have it. We are now stopping Miner Willy from falling through the floor. Well, the standard solid floor, at least!
That will probably do for this episode, so come back soon for the next episode, where we will continue to build out the collision detection on other types of tiles and also look at adding things above and to the side of Miner Willy. In the mean time, I hope you have enjoyed my ramblings on this element of collision detection, and remember that the source code is all available on my GitHub page.
Welcome to episode eight of our Let’s Remake Manic Miner series. In this episode, we are going to look at how we can add some collision detection to Miner Willy. This episode is going to be super long, so it will be split into multiple parts. In part one, we will discuss the concept of collision detection and how we can deal with it in STOS.
Ok, now that we’ve cleared that up, we can crack on… what? explain it a little more? Alright then!
When we’re talking about computer games, what it is basically saying is: How can we tell if one object in our program is overlapping (intersecting) another object in our program? In other words, colliding with each other. In our instance, objects are the different game elements, such as walls, nasties, guardians, and Miner Willy himself.
When you’re dealing with game sprites, there are various ways this can be done, and there are varying terms such as collision masks, bounding boxes, and hitboxes. I’m not going to deal with any of these elements as part of this series, so please read up on those independently. We’re going to simplify things just as Matthew Smith did with Manic Miner and check various points around our Miner Willy character to determine what he is up against. I guess you could call these hitboxes, albeit very small ones.
Hotspots
Before we look at the points at which we are going to calculate collisions, let’s have a quick discussion about hotspots. Firstly, what is a hotspot? A sprite hotspot is a point on a sprite image that defines its origin or centre of rotation. It is specified by a pair of coordinates relative to the top-left corner of the sprite. For example, a sprite hotspot of (0,0) means that the top-left pixel of the sprite is its origin, while a sprite hotspot of (16,16) means that the pixel at 16 pixels from the left and 16 pixels from the top is its origin. Sprite hotspots are useful for positioning and transforming sprites on the screen, such as moving, scaling, rotating, or flipping them.
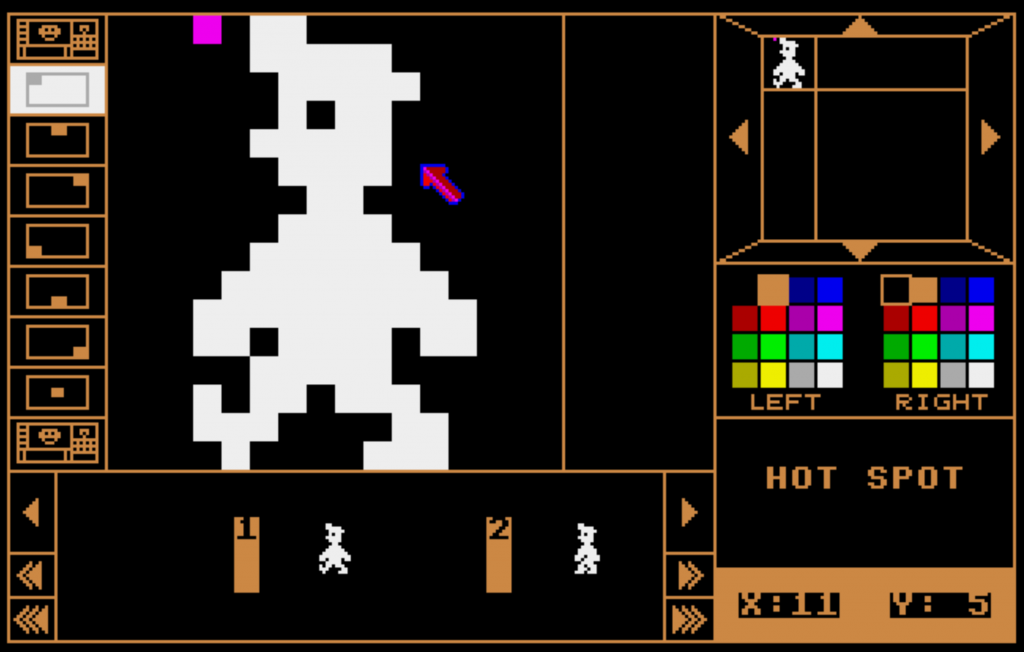
STOS provides a hotspot for its sprites, which denotes the 0,0 origin of the sprite. That is to say, if you displayed the sprite at 0,0, the hotspot is the part of the sprite that would be shown at 0,0. We can edit the hotspot of a sprite using this STOS sprite editor.
The purple square at the top left of the Miner Willy image denotes the existing hotspot. You can see with the options on the left-hand side that STOS offers a number of defaults that can be applied to your sprite. You can have a different hotspot per animation frame, which makes using the STOS collision routines easier to work with.
Our hotspot is currently at xposition 3, and yposition 0. If we were to place our sprite on the STOS screen at 0,0, it is this position that would be shown there, meaning that the top left of our sprite is actually being displayed at -3,0.
Collisions using hotspots
STOS only caters for the use of a single hotspot for it’s collision detection, and it uses a rectangular hitbox with a defined width and height. This is performed using the COLLIDE command that is available to us. However, it only detects collisions between sprites. Because of the way we are writing Manic Miner, the only sprites we will have on screen will be the guardians, as they are the only moving elements; everything else is static. We may revisit that statement later in the series when we look at the conveyor belts, but for the moment, let’s stick to it! We can’t therefore use the standard STOS COLLIDE command for this, so we will need to come up with a different way of doing it.
You can find more information about the STOS collision detection on page 94 of the STOS user manual.
Irregular-shape collision
We could look at using the DETECT command within STOS to allow us to detect the pixel colour that is under our hotspot and then execute our collision code depending on what we find. This method has merit; however, it has a number of drawbacks. Firstly, the DETECT command is ridiculously slow! Do we even need to discuss other drawbacks now? There is, for me, an even bigger drawback. It will literally grab the colour of the pixel under the hotspot. So if your game has some form of background or map, then that is going to be returned if your sprite is over it. It would have been a much better command if you could specify a different memory area other than the main screen. That’s where The Missing Link / Misty extension POINT command comes in handy because you can make an image-based collision map as a separate screen image and read data from that.
You can find more information about the STOS DETECT command on page 97 of the user manual.
Collision maps
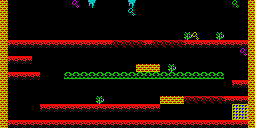
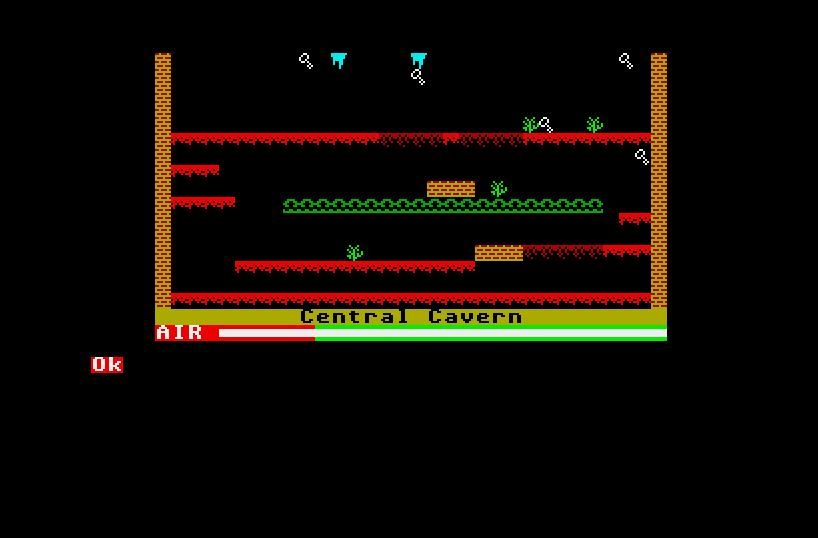
For Manic Miner, we’re going to use the concept of a collision map, but what is that? Collision maps can come in two forms, but they essentially perform the same task; they represent shapes that will be used for collision checking. Let’s generate both types of collision maps for the Central Cavern level.
This is what our level looks like without the sprites on it.
Image-based collision map
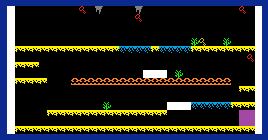
The first type of collision map is an image-based one. This means that an image is used to define the collision rules for areas of the screen. This is where The Missing Link / Misty extension POINT command would be used. To convert the above map into an image-based collision map, we simply replace the coloured elements of the map with something that means something to us. For example, we set all the walls to colour 1, all the floors to colour 2, etc. That way, when the POINT command is used, we know how to deal with the returned value that we get.
This is an example of how our image may look after we have done that conversion. I’ve added a dark blue border to highlight the white sides of the image.
What we can see here is that we have removed all colour detail from the image. Sure, it’s only the yellow and red of the bricks and the detail from the portal, but hopefully you get the idea. What we could now do is use this image for reading points under Miner Willy and then, depending on the colour we get back, act appropriately. For example, if Miner Willy hits a yellow pixel, we know that he’s hit the floor and can therefore stop falling. If he hits a green pixel, we know he has collided with the cactus, which will make him lose his life.
Tile-based collision map
So what’s the difference between an image-based collision map and a tile-based collision map? Rather than using a picture and colours, we reference a table that holds the number of the map tile that is under our character. We can then use that to decide how Miner Willy reacts. For example, if he hits a wall tile, we can stop him from walking.
There are commands in The Missing Link / Misty that deal with what tile is at what coordinates within its WORLD command mapping functions. But, alas, we are using raw STOS, and this is not an option for us.
You’ll remember from episode 6 where we actually built our level, and we used data statements to hold which tiles to show where on the map. Well, that’s our tile map, and it’s the method we are going to use for our game.
But what we are going to do is simplify it so that we don’t have to keep checking loads and loads of different values all the time – the fewer IF/THEN statements we need to do, the better. Wouldn’t it be wonderful if STOS had a case statement? Sigh.
What we will do is simplify the map to identifiable elements rather than sprite numbers. Much like we did with the colours, but this time identifying the type of tile that is at the coordinate. Each level in Manic Miner has eight different tile elements that can be used within the screen, so this means we can really simplify our collision map. Happy days!
#
Description
0
Represents a transparent area on the screen. So where we see a zero, it means there is no tile present.
1
Represents a solid wall tile that Miner Willy cannot walk or jump through
2
Represents a standard, solid floor tile that Miner Willy stands on. He can jump through it, but he cannot fall through it.
3
Represents a crumbling floor tile. These are the tiles that slowly disappear the longer that Miner Willy stands on them.
4
Represents a conveyor belt. When Miner Willy stands on one of these tiles, he will automatically move in the direction that the belt is rotating.
5
Represents a nasty such as a cactus. When Miner Willy hits these, he will lose a life.
6
Represents a collectable item, such as a key.
7
An actionable object, such as the switches that are used in later levels of the game.
So all we need to do is transpose the data we created in episode six into the tile representations above. Let’s add the tile map to our source code and read it into memory, ready for usage.
We’ll modify our @NewGame function so that we’re not constantly loading and reading the level information. We’ll add a new @InitLevel function so that we can handle the loading of the image and the reading of the map data.
@NewGame
    LVL = 1 : LIVES = 3 : GAMEOVER = false
    gosub @InitLevel

    // Level loop
    repeat
        gosub @InitMinerWilly
        LVLDONE = false : MWDEAD = false

        // Gameplay loop
        repeat
            gosub @ReadJoystick
            gosub @DisplayMinerWilly
            gosub @WaitVBL
        until LVLDON or MWDEAD

        if MWDEAD then dec LIVES : GAMEOVER = (LIVES = 0)
        if LVLDONE then inc LVL : gosub @InitLevel
    until GAMEOVER
    return

@InitLevel
    LVL$ = str$(LVL) - " " : if len(LVL$) = 1 then LVL$ = "0" + LVL$
    load "LEVEL" + LVL$ + ".PI1",10
    screen copy 10 to physic : screen copy 10 to back
    return
Now let’s add the relevant code to read the tile map into memory from the data statements.
Firstly, at the beginning of the code, we will define some room for the tilemap. We’ll do this using an array.
erase 10 : reserve as screen 10

// Create some memory for the tile map data (32x16 tiles)
dim map(511)

gosub @LoadAssets
Could we create a bigger array? For sure, we could create an array that represents each x and y pixel on the screen to hold what tile is at that pixel to save having to convert to tile position, thus saving CPU time. But that takes memory (it would take 64k in fact), and we want to keep this game as lean as possible. So we are going to have to sacrifice a little speed for memory.
Add the following code to the @InitLevel function
@InitLevel
    restore
    read LVLNAME$

    for t = 0 to 511
        read TNO
        map(t) = TNO
    next t

    LVL$ = str$(LVL) - " " : if len(LVL$) = 1 then LVL$ = "0" + LVL$
    load "LEVEL" + LVL$ + ".PI1",10
    screen copy 10 to physic : screen copy 10 to back

    return
Here we are simply reading the tile number in one large stream. We need to remember that there are 32 tiles going across the screen and 16 tiles going down.
I think that is probably enough for this part of episode 8. In the next episode, we will use the map data and add the code necessary to stop Miner Willy from walking through walls.
Welcome to episode seven of our Let’s Remake Manic Miner series. In a shorter episode for today, we are going to get back into our main source file and take a look at some environmental concerns. That is, we are going to turn our attention to the environment in which we are going to place Miner Willy.
Before We Begin
In our last episode, we created a simple program that used our Manic Miner sprite bank and saved a representation of the Central Cavern level as a Degas format screen. We will need to load that image into our game in order to make Miner Willy feel at home. One of the things that we need to remember is that we are creating a game engine, so I think we should start adding some elements to respect that. We’ll need to make some adjustments to our main game loop first. In fact, we need to build an entire new loop so that we can control the loading of level information and set up each level before the main game loop starts. We’ll also set up some placeholder subroutines to handle things like the main menu.
The above shows what our main game loop looked like previously. What we are going to do is change that drastically so that we have some game logic executed. Remove the code and replace it with the following:
gosub @LoadAssets
gosub @MainMenu
end
Let’s add a new subroutine to deal with the main menu. We’re not going to do anything here for the time being other than create this as a spaceholder that then calls our main game loop.
@MainMenu
    QUIT = false
    repeat
        gosub @NewGame
    until QUIT
    return
Command
Description
QUIT = false
Here we are defining a new boolean variable called QUIT. We are setting it’s initial state to be false and will use this variable to determine whether to quit the main menu. Quitting the main menu will exit the loop and end the program.
REPEAT GOSUB @NewGame UNTIL QUIT
As we’re not actually coding a menu at the moment, we’ll simply call a new subroutine and start a new game. Ultimately we will do “stuff” in this menu loop and only call @NewGame when the option to start a new game has been selected by the player.
Notice how we don’t do UNTIL (QUIT = true)? That’s because (if you remember earlier episodes) everything evaluates to true or false. By specifying QUIT = true, we would effectively be saying UNTIL (true = true) or UNTIL (false = true). We replace this check with the QUIT variable instead, which gives us UNTIL true or UNTIL false. When Quit is false, then the statement does not equate to true, and the loop is repeated.
RETURN
As we know, it returns us to the line of code that called the GOSUB instruction.
We now need to create the @NewGame subroutine to deal with the main game play. This is where we will see more changes as we prepare our game engine for various game play elements such as finishing a level, Miner Willy being killed by falling too far, or hitting an obstacle or baddie.
@NewGame
    LVL = 1 : LIVES = 3 : GAMEOVER = false

    // Level loop
    repeat
        gosub @InitMinerWilly
        LVLDONE = false : MWDEAD = false

        // Gameplay loop
        repeat
            gosub @ReadJoystick
            gosub @DisplayMinerWilly
            gosub @WaitVBL
        until LVLDONE or MWDEAD

        if MWDEAD then dec LIVES : GAMEOVER = (LIVES = 0)
        if LVLDONE then inc LVL
    until GAMEOVER
    return
Instruction
Description
LVL = 1
We introduce a new variable, LVL, to hold the current level that we are playing. Because this is a newly initialised game, we set the level to 1.
We could employ a cheat at some point too that allows us to start at a different level number. That would come in handy when testing further level structures.
LIVES = 3
We introduce the LIVES variable to hold the number of lives that we have left.
We start with three lives, and each time Miner Willy dies, we decrease the number of lives we have.
GAMEOVER = false
Our final new variable holds whether it’s game over or not.
This works hand in hand with the LIVES variable, and when that reaches zero, we set GAMEOVER to true.
REPEAT
Now that we have initialised our new variables, we enter what I call the level loop. It is within this loop that we prepare the environment, load the level graphics, and reset Miner Willy to his starting positions.
GOSUB @InitMinerWilly
This is our call to the @InitMinerWilly subroutine that we previously had earlier in the code. We’ve moved it within this loop to make sure Miner Willy is initialised each time a level starts. We can do this here as one of the features of Manic Miner is that when Miner Willy dies, the whole level is reset back to the beginning.
LVLDONE = false
We introduce the LVLDONE variable. This is used to determine if the level is done or not.
Initially, the level is not done because we need to complete it.
MWDEAD = false
This variable holds whether Miner Willy is dead. It will be set when we collide with something that we shouldn’t or fall too far.
REPEAT GOSUB @ReadJoystick GOSUB @DisplayMinerWilly GOSUB @WaitVBL UNTIL LVLDONE OR MWDEAD
This is the same game loop that we had before; we’ve just moved it’s location.
We’ve also changed the UNTIL false to be UNTIL LVLDONE OR MWDEAD, which allows us to set either of these variables to break out of the game loop.
IF MWDEAD THEN DEC LIVES : GAMEOVER = (LIVES = 0)
Once we are outside the game loop, we then check the MWDEAD variable to see if the reason we dropped out of the loop was because Miner Willy died. If so, we use the DEC instruction to decrease the value of the LIVES variable, and then we set the GAMEOVER variable by evaluating whether LIVES = 0.
Remembering that all expressions evaluate to true or false, GAMEOVER = (LIVES = 0) is the same as saying IF LIVES = 0 THEN GAMEOVER = true. We have therefore achieved the same result without having to perform additional costly calculations.
IF LVLDONE THEN INC LVL
If we have quit the game loop because the level has been completed, we increase LVL so that next time the game loop triggers, we will be on the next level.
UNTIL GAMEOVER
Keep executing the repeat loop until the GAMEOVER flag has been set to true.
You can give this code a run, but it will just look the same as it did before. Miner Willy will still be able to walk and jump, but at least we have everything safely wrapped up in our menu, level, and game play loops now, with the appropriate breaks defined and used.
The Level Graphic
We’ve got our nice graphic for our level, so let’s add that to the equation and implement the code that will load the image and display it in our level loop before the main game loop starts. To do this, we are going to employ the use of a STOS memory bank. In STOS, screen memory banks come in two different flavours: a screen or a datascreen.
Screens are temporary memory banks that are predefined at the correct size for holding an ST screen, no matter what the resolution. When the program has finished running, the memory used for the screen is released, and the memory bank is deleted. This means you have to always reserve the memory bank and load your assets into it during the operation of your program.
Datascreens are the same as screen banks; however, they are permanent, and when the program finishes executing, the memory bank remains in memory and is available to be used again. You can load assets into a datascreen from the STOS command line rather than as code within your program.
We are going to use a screen because we want to use as little memory as possible, and we will load our level images as we require them. Add the following line of code at the beginning of the program.
key off : curs off : click off : flash off : mode 0 : hide on : auto back off : anim off : synchro off
palette $000,$777,$005,$007,$500,$700,$504,$707,$050,$070,$055,$077,$550,$770,$555,$777
erase 10 : reserve as screen 10
Instruction
Description
ERASE 10
Here we are erasing any databank that we may already have defined within bank 10 of STOS.
This call is actually redundant at this point as the program has only just executed, and in theory there should be no memory banks defined at all. However, I’m always in the habit of erasing memory banks, and it really makes no difference; it just makes me feel better.
RESERVE AS SCREEN 10
This is the instruction that signals to STOS that we want to create a temporary memory bank to hold ST screen data.
We’ve specified that we want this bank to be allocated to the memory bank 10 slot.
Once the above has been executed, we now have enough memory space allocated to load our level. We do this in our level loop by adding the following code:
repeat
load "LEVEL01.PI1",10screen copy 10 to physic : screen copy 10 to back
gosub @InitMinerWilly
LVLDONE = false : MWDEAD = false
Instruction
Description
LOAD “LEVEL01.PI1”,10
The LOAD command does just that; it loads our named asset “LEVEL01.PI1” and places it into memory bank 10. Because we are using known bank numbers and known file formats, STOS will handle all of this for us.
SCREEN COPY 10 TO physic
The SCREEN COPY instruction in STOS has many different forms. Here we are using quite possibly the simplest variation that copies an entire screen of data from one memory address to the other (bank 10 to the physical screen).
SCREEN COPY 10 TO back
The same as above, but this time we are copying the image to the background screen.
We do this because STOS automatically saves the background, and if we don’t, when Miner Willy walks over the landscape, it will be blanked out. Try it and see what happens.
You can run that now and see what the results are. We should have an environment that doesn’t get overwritten when Miner Willy moves around it.
Finally, let’s make the level loading a little more dynamic. Rather than having the hard-coded “LEVEL01.PI1” image load, let’s calculate the filename based on the LVL variable. This could be done in a number of ways, but we’ll just do it in a simple way that shows some of the string manipulation instructions in STOS.
Update the LOAD “LEVEL01.PI1” line of code to the following:
The STR$ instruction converts a number into a text string. After this call, LVL$ holds the current level as a text string.
One thing to note, though, is that STOS always adds a leading space to any number that it converts to a text string. Therefore, with our LVL set to 1, the resulting string is ” 1″.
We can then simply subtract spaces from the string by using – ” “.
Nice!
IFLEN(LVL$) = 1 THEN LVL$ = “0” + LVL$
Here we are just checking if the resulting string is only 1 character in length.
If so, we are adding a 0 to the front of it to pad anything less than 10 to be 01, 02, 03, etc.
LOAD “LEVEL” + LVL$ + “.PI1”,10
Finally, we construct the full filename by adding all the elements together and load the image into screen bank 10.
Ok, that’s all we’ve got time for today folks – I said it was going to be a shorter one! As always, the source files can be found in the GitHub repository.
In our next episode, we will start to look at how to add some basic collision detection so Willy can be stopped from walking off the screen and falling into oblivion. Until then… Happy STOSing.
Welcome to episode six of our Let’s Remake Manic Miner series. Today we are going to take a little bit of a break from our Manic Miner main code and instead look at how we can go about creating a level for Miner Willy to walk around in; in particular, level 1 – Central Cavern.
So, without further ado, let’s get into it…
Central Cavern
Central Cavern is the first level of Manic Miner, and it introduces a number of the required skills that need to be mastered throughout the rest of the game. We have keys to collect, an enemy to avoid, obstacles to jump over, dissolving floors to navigate, and an exit portal to get back to. Pretty much everything we will get on all the other levels, with the exception of some of the levels that also employ levers.
Decoding the Level
Before jumping straight in to creating the level, let’s breakdown what is going on in Central Cavern; this will give us a better understanding of what we need to achieve to replicate this in STOS.
Gameplay Area
Each level within Manic Miner is exactly the same size. If we take a look in detail at Central Cavern, we can see that the game blocks are all 8×8 pixels. We learnt early on in the series about the ZX Spectrums graphics processing, and so this really isn’t to be unexpected, but this does pose a problem for us within STOS – more on this later. Using the screen above, we can roughly estimate the number of 8×8 tiles that make up the screen.
Knowing that the ZX Spectrum screen resolution is 256×192, we can calculate this very easily. 256 pixels divided by 8 gives us 32 sections of 8 pixels going across the screen horizontally. We can test this theory out using the text that is displayed on the screen. Let’s count them…
How do we know there are three spaces in the middle of the text? Simply put, we can look at the “Cav” bit of the word “Caven”, and that shows us the three characters. Happy days! We can confidently say there are 32 tiles horizontally across the screen.
Now we just need to confirm the number of vertical tiles. Well, we’ll just have to count them to get our number, but again, it’s straight-forward. After counting them up, I deduced that, in total, there are 16 tiles vertically. We therefore now know that our game play area, or “map,” is 32×16 tiles that are 8×8 pixels in size. In terms of pixels, that is 256×128.
We can also see that both the far left and far right of the level are nothing but walls in order to keep Miner Willy from running off the screen.
Underneath the main area are the name of the level, the air supply, scores, and the number of lives remaining. I suppose these days you would call this a HUD or status bar. We can calculate the height of the status information by simply subtracting the 128 game map size from the 192 pixels that we know the screen is in height. This gives us a status bar of 64 pixels, or 8 characters. Let’s count them to make sure…
Name of the level = 8 pixels (1 character)
Air Supply = 8 pixels
Blank Space = 8 pixels
Scores = 8 pixels
Blank Space = 8 pixels
Miner Willy pixels 0 to 7 = 8 pixels
Miner Willy pixels 8 to 15 = 8 pixels
Blank Space = 8 pixels
There we are: 64 pixels, or 8 characters.
We’ve successfully determined how the level is formatted, and we can apply that logic across all the levels because they are all the same.
Recreating in STOS
It should be easy to recreate this in STOS, yes? Well, not quite!
Whenever you are looking at a tile type system on the ST, you’re pretty much limited to 16 pixels. And we learned early on in this series that STOS uses a minimum sprite width of 16 pixels too—what a bummer!
We could make a tile set that has 16 pixels using different combinations, but that would result in a crazy amount of sprites, and as we know, sprites take memory, so if we want to limit the amount of memory we are using, that is out of the question. Using a tile set is simply not an option because of the 16-pixel limitation, so what can we do?
Well, not to put too fine a point on it, we’re going to have to do this manually and create our map from sprites. We know that we can place sprites at any x position offset, meaning we can use our 8×8 sprite images without a problem. But STOS has a limit of 15 sprites on screen at one time, and in any case, displaying that amount of sprites without overloading the CPU and destroying our frame rate is simply not possible. Therefore, we need to create an image of the level, but how do we go about that?
Luckily, STOS has this nice little command called PUT SPRITE, which is listed on page 97 of the user manual in the section entitled “Exceeding the 15 sprite limit”. It reads like this:
Exceeding the 15 sprite limit
If you’ve ever seen games like Galaxians or Space Invaders you will probably consider the 15 sprite limit to be pretty restrictive. Fortunately, although you are confined to 15 moving sprites, it’s easy enough to produce the illusion of dozens of actual sprites on the screen.
You can do this with judicious use of a part of STOS Basic commands called PUT SPRITE and GET SPRITE. These allow you to create a number of copies of a sprite at one, and then just grab the one you wish to actually move around, as and when you need them. You can add animations to these fake sprites using the SCREEN COPY and SCREEN SWAP functions.
– STOS Basic User Manual, Page 97.
Simply put, the PUT SPRITE command essentially stamps the image of the specified sprite on the screen permanently, meaning we can splat (or in the words of Jon Stock – “podge” – I like this word!) them where we want, and build up our level image in the process. We can then save the resulting image as a PI1 for use in our game. Yes, the image will take roughly 32kb, but ultimately we can compress those down, and because of the colour usage, they will shrink pretty small!
Let’s Start a New Program
As mentioned earlier, we are not going to be heading into our main game source code in this episode, so let’s create a new source file and we will work with that. To begin with, we can copy some of the code from our main game in order to make things quicker to get up and running.
rem *** Manic Miner - STOS Basic Recreation
rem *** Level Creation Tool
rem ***
rem *** Written by Neil Halliday / STOS Coders
rem ***
rem *** main.stos : main program file

key off : curs off : click off : flash off : mode 0 : hide on : auto back off : anim off : synchro off
palette $000,$777,$005,$007,$500,$700,$504,$707,$050,$070,$055,$077,$550,$770,$555,$777
SXOFFSET = 32 : SYOFFSET = 0
gosub @LoadAssets
end

@LoadAssets
    erase 1 : load "MANIC.MBK",1
    return
I’m not going to explain the above code, as we’ve already been through that, so check out a previous episode for further reading about what that is doing. Let’s just say it sets up our screen, our palette, and loads our sprites.
Level Data
When working with tile sets such as those in TOME or as provided for in the WORLD command in Missing Link, we generally have some form of nice visual editor that goes with them—well, when I say nice, let’s just say functional!
Effectively, though, all those programs actually do is build a tile list which is a series of data values that represents the number of tiles that need to be displayed at a particular part of the map. Depending on what your preferred tile/map system is, it could be a byte of data that represents each tile or a word (2 bytes) of data. If you work within a byte of data, that allows you to represent values 0 to 255 per byte and therefore restricts you to 256 different tile images within your map. If you work with two bytes per tile, then you can represent values 0 to 65,535; but of course, your map data takes twice the space.
This data would normally be stored within a databank in STOS. We could do the same; however, we are going to keep things simple in our game for now and just use an array like we have seen before. An array is essentially the same as a databank in that it’s data in memory; we just access it differently. We’ll get to this bit in our next episode, so for now we are just going to set the data and read it without storing it.
But how do we set up this data? Well, it’s quite simple, really. We use the RESTORE command along with the DATA and READ commands.
RESTORE
This instruction changes the line number at which a subsequent READ operation will expect to find the next DATA statement.
– STOS Basic User Manual, Page 226/227.
DATA
The DATA statement allows you to incorporate lists of useful data directly inside a Basic program. This data can be loaded into a variable using the READ instruction.
– STOS Basic User Manual, Page 225/226.
READ
READ allows you to input some data stored in a DATA statement into a list of variables. It starts off with the first data statement in the program, and then reads each subsequent item of data in turn. As you might expect, the variable used in each READ instruction must always be of the same type as the information stored in the current DATA statement.
– STOS Basic User Manual, Page 226.
So what are we going to store in our data? The answer to that is quite easy too; we’re simply going to hold the tile numbers that we need to display on the screen to make our level look correct. In our case, our tile numbers will also be the sprite/image number from our sprite bank. That makes things nice and easy. We’re also going to hold some other information that saves us time and CPU usage when we come to use our game map.
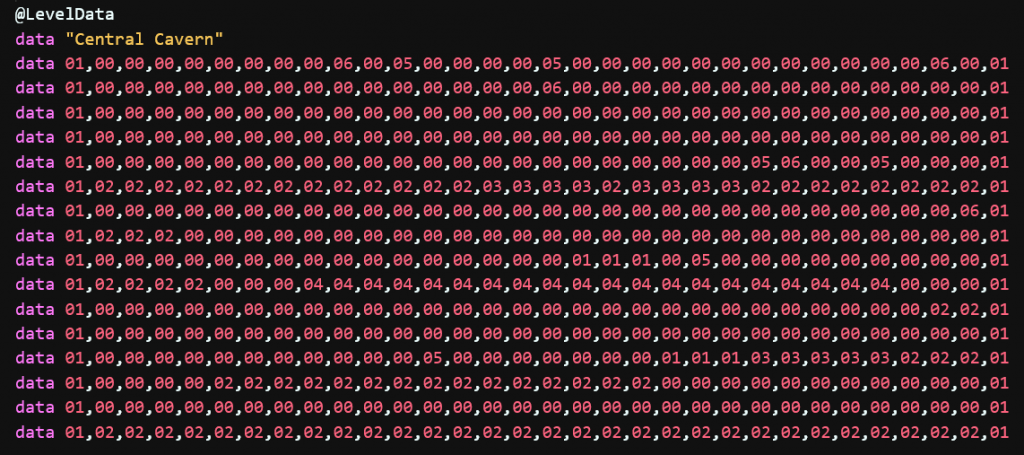
So, let’s create our data statements to hold our level data.
@LevelData
data "Central Cavern"
data 23,00,00,00,00,00,00,00,00,33,00,35,00,00,00,00,35,00,00,00,00,00,00,00,00,00,00,00,00,33,00,23
data 23,00,00,00,00,00,00,00,00,00,00,00,00,00,00,00,33,00,00,00,00,00,00,00,00,00,00,00,00,00,00,23
data 23,00,00,00,00,00,00,00,00,00,00,00,00,00,00,00,00,00,00,00,00,00,00,00,00,00,00,00,00,00,00,23
data 23,00,00,00,00,00,00,00,00,00,00,00,00,00,00,00,00,00,00,00,00,00,00,00,00,00,00,00,00,00,00,23
data 23,00,00,00,00,00,00,00,00,00,00,00,00,00,00,00,00,00,00,00,00,00,00,34,33,00,00,34,00,00,00,23
data 23,24,24,24,24,24,24,24,24,24,24,24,24,24,25,25,25,25,24,25,25,25,25,24,24,24,24,24,24,24,24,23
data 23,00,00,00,00,00,00,00,00,00,00,00,00,00,00,00,00,00,00,00,00,00,00,00,00,00,00,00,00,00,33,23
data 23,24,24,24,00,00,00,00,00,00,00,00,00,00,00,00,00,00,00,00,00,00,00,00,00,00,00,00,00,00,00,23
data 23,00,00,00,00,00,00,00,00,00,00,00,00,00,00,00,00,23,23,23,00,34,00,00,00,00,00,00,00,00,00,23
data 23,24,24,24,24,00,00,00,29,29,29,29,29,29,29,29,29,29,29,29,29,29,29,29,29,29,29,29,00,00,00,23
data 23,00,00,00,00,00,00,00,00,00,00,00,00,00,00,00,00,00,00,00,00,00,00,00,00,00,00,00,00,24,24,23
data 23,00,00,00,00,00,00,00,00,00,00,00,00,00,00,00,00,00,00,00,00,00,00,00,00,00,00,00,00,00,00,23
data 23,00,00,00,00,00,00,00,00,00,00,00,34,00,00,00,00,00,00,00,23,23,23,25,25,25,25,25,24,24,24,23
data 23,00,00,00,00,24,24,24,24,24,24,24,24,24,24,24,24,24,24,24,00,00,00,00,00,00,00,00,00,00,00,23
data 23,00,00,00,00,00,00,00,00,00,00,00,00,00,00,00,00,00,00,00,00,00,00,00,00,00,00,00,00,00,00,23
data 23,24,24,24,24,24,24,24,24,24,24,24,24,24,24,24,24,24,24,24,24,24,24,24,24,24,24,24,24,24,24,23
data 19,19,19,19,19,19,19,19,19,19,19,19,19,19,19,19,19,19,19,19,19,19,19,19,19,19,19,19,19,19,19,19
data 12,12,12,12,12,12,12,12,12,12,16,16,16,16,16,16,16,16,16,16,16,16,16,16,16,16,16,16,16,16,16,16
As you can see, it looks a little meaningless in this form, but it does represent the layout of Central Cavern – honest! It also looks a bit messy in the code section above, but it will all look much better in the VS Code environment once you have it in there.
You’ll also notice that I’m including the name of the level in there too. That will become clear soon enough.
Generating the Level
Now that our data is entered into STOS, we can start to use it. So we need to put in place the code that reads the data, starting at the top left of the screen, working our way across the screen for 32 tiles, and then down to the next line until we reach the bottom of the screen. We will do this with a simple FOR/NEXT loop. Let’s create our code to do that.
@MakeLevel
    restore
    read levnm$
    for ypos = 0 to 17 : for xpos = 0 to 31
        txpos = (xpos * 8) + SXOFFSET
        typos = (ypos * 8) + SYOFFSET
        read spn : if spn > 0 then sprite 1,txpos,typos,spn : put sprite 1 : wait vbl
    next xpos : next ypos

    paper 12 : pen 0 : locate 0,16 : centre levnm$
    paper 5 : pen 15 : locate 4,17 : print "AIR"
    ink 15 : bar 64,138 to 287,141
    return
Let’s explain what is going on here, shall we?
Command
Description
RESTORE
As per the explanation above, what we are doing here is telling STOS to restore a particular DATA statement so we can begin reading our data. Normally what we would do here is specify the line number, but while I was writing this tutorial, I noticed that there was a slight bug in the VS Code transpiler to STOS in which it translates the line number exactly to the label. When this happens, the RESTORE command fails as the line contains the label text and not data. Oooopsy! I will get that fixed in the near future.
Anyway, by not specifying a line number, it resets STOS to expecting the first DATA statement, which in our case works in our favour!
READ levnm$
This command reads the first bit of data; in our case, it is the name of the level. Because we specify this as a string, STOS will read the content of the data held within quotation marks as the entire string. In the background, STOS will be null-terminating the string, and so we effectively read a stream of data until that null value is reached.
FOR ypos = 0 TO 17 : FOR xpos = 0 TO 31
We’ve seen FOR/NEXT loops already, so I’m not going to go into the details here on this one. We’re reading 18 lines of y position data and 32 blocks of x position data. These loops allow us to start at the top left of the screen, working our way across and down, starting from the left again when a new line is reached.
txpos = (xpos * 8) + SXOFFSET
Here we are creating a temporary x position on the screen by using the xpos variable, multiplying it by 8 to get the appropriate pixel position, and then adding the SXOFFSET variable that we previously created in order to centre the ZX Spectrum screen on the ST.
typos = (ypos * 8) + SYOFFSET
We do the same for the y position.
READ spn
Now we read the sprite number (spn) from the data set. This will also move the data pointer to the next value within the DATA instruction.
IF spn > 0 THEN
We only want to do the next set of commands when spn is greater than zero. Zero represents when there is no sprite, and therefore is just a transparent background.
SPRITE 1,txpos,typos,spn
We’ve already seen the SPRITE command in use when we are displaying Miner Willy. So this is just the same, and instead of changing the animation frame of Willy, we’re changing the animation frame to that of the tile we want to display.
PUT SPRITE 1
Now we tell STOS to put, splat (or podge) the sprite 1 image onto the background. Thus stamping into the screen.
WAIT VBL
Interesting. Why are we using a WAIT VBL command at the end of all this? Well, take it out and run it to see what happens – it’s a mess!
PUT SPRITE only appears to work when using a WAIT VBL command. Presumably this is because the sprite functionality in STOS is running on an interrupt that is linked to the vertical blank (every 50th or 60th of a second depending on PAL or NTSC), and when you do things en masse like we’re doing here, it’s running quicker than the sprite interrupt.
So we put this WAIT VBL here to make sure we’re on time and the PUT SPRITE doesn’t mess up.
We could also use the UPDATE instruction; however, I still get odd results when doing this. So we’ll stick with WAIT VBL for now.
NEXT xpos : NEXT ypos
Finish the FOR/NEXT loop.
PAPER 12 : PEN 0 : LOCATE 0,16 : CENTRE levnm$
A few little text instructions here for us to digest.
PAPER sets the background colour of the text that we want to display.
PEN sets the foreground colour of the text that we want to display.
LOCATE moves the cursor to the specified 8×8 text position on the screen based on the x position and y position specified. Here we are moving the cursor to x=0 and y=16.
CENTRE tells STOS to print the text levnm$ centred at the position last specified in the LOCATE instruction. Note that this is not a pixel-perfect centre, it is based on the 8×8 character grid.
Here we are printing the name of the level centred on the screen.
PAPER 5 : PEN 15 : LOCATE 4,17 : PRINT “AIR”
As with the above, we are printing on the screen, this time at positions 4,17 and simply printing the word “AIR” starting at that location rather than centering the text.
INK 15 : BAR 64,138 to 287,141
INK sets the colour that any shape drawing or plotting operation will use as it’s colour.
BAR draws a solid/filled rectangle from xpos,ypos to xpos2,ypos2, which represents the top-left and bottom-right of the rectangle.
Finally, we need to add a call to our subroutine to make the level draw.
gosub @LoadAssets
gosub @MakeLevel
end
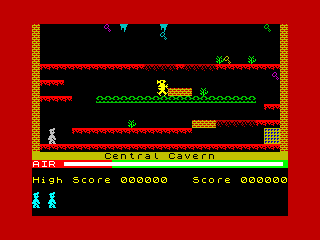
If you run the routine now, you should get something like the following:
A nice rendition of the Central Cavern. Whoop whoop!
Hang On! Why are we drawing the air at maximum? Shouldn’t we do that during our game loop? Well, that is a very, very good question. We could do that, but remember, drawing things to the screen takes CPU time, so the idea is to draw as little information as possible per frame. If we draw a white box from X,Y to X2,Y2 every frame, that’s a lot of drawing that needs to be done, and we all know that STOS is very slow when drawing things like that. Therefore, if we draw the entire air time that is left, our game loop simply needs to draw a single 4 pixel line each time the air changes. This will be done in the appropriate colour, either green or red, moving from right to left. That is much faster than drawing a filled rectangle for each frame – yay!
Save the Level Screen
The final thing we now need to do is save the level screen so that it can be loaded into our main game loop. This bit is really easy to do:
gosub @LoadAssets
gosub @MakeLevel
save "LEVEL01.PI1",physic
end
And there we have it. We’ve generated our level map and saved it as an image so that we can use it in our main game loop.
And so, we’ve reached the end of another exciting episode of Let’s Remake Manic Miner. As always, the source files can be found in the GitHub repository.
In our next episode, we will start to look at how to integrate our environment into our main game loop. Until then… Happy STOSing.
Welcome to episode five of our Let’s Remake Manic Miner series. Today we are going to look at making Miner Willy move around the Y axis of the screen. So, in the immortal words of Eddie Van Halen… Might as well jump! Cue cheesy music video, big hair, and flamboyant costumes… Oh, what the hell, here’s a link on YouTube so you can listen while you read!
What is Jumping?
It may seem obvious to you and me, but what actually is jumping? According to Wikipedia…
Jumping or leaping is a form of locomotion or movement in which an organism or non-living (e.g., robotic) mechanical system propels itself through the air along a ballistic trajectory.
https://en.wikipedia.org/wiki/Jumping
But what does that mean in terms of a game? Well, it’s really dependent on what you are trying to achieve. Looking at the definition above, we can pick out a few words to look at:
Locomotion, movement, propels are all basically the same thing: some form of movement.
Air… hmm, so we know we’re moving through air, but when we’re not jumping, we’re not moving through the air. Does it mean, therefore, that we just stop and float? Of course not; there is that little thing called gravity, that invisible force that causes mutual attraction between all things that have mass. We know about it, but a game doesn’t. But what does gravity do? Simply put, it constantly pulls us down towards the ground until we reach it or land on something that cannot be pulled any further. Like when you are in the upstairs of your house, you are still being pulled towards the ground, but the floor stops you from getting there. Remove the floor, and down you go. If you want to see gravity in action, watch Felix Baumgartner!
A trajectory is essentially a path of movement, and a ballistic trajectory is the motion of an object that is moving in a gravitational field.
Few! We now know, though, that our jump is comprised of a few elements, but we can pick just the two that we need: trajectory and gravity.
Gravity
Gravity is a really easy thing to implement. Effectively, you just pull your character down (increase the Y position) by an ever-increasing amount until you reach terminal velocity. Usually, this is done using a decimal value that steadily increases over time and then gets added to your Y position. To represent this, we need two variables: SPEED and GRAVITY. We constantly increase SPEED by GRAVITY and then add SPEED to our YPOS, thus moving the character down the screen. If we hit the ground or an immovable object of some form, the SPEED variable is reset to zero, ready for the process to start again. A simple jump can then be created by setting the SPEED variable to a negative number to create upward velocity.
You can learn more about jump mechanics in this great YouTube video. It’s not in English, but the subtitles are great, and it does explain jump mechanics very well.
So let’s implement this into our game, shall we? No, we’re not going to do that! It was really interesting to learn how jumping works, but this is not what Manic Miner does. But at least you know how to implement jumping for your other projects!
Manic Miner Jumping
The way Miner Willy jumps is far more prescriptive than the process we described above. When Willy jumps, he travels a predetermined path and keeps going until he hits something or lands on something, in which case he stops. If Willy completes his jump (i.e., his ending vertical position is the same as his starting position), he then falls in a straight line until he hits the ground.
While he is jumping, he cannot change direction, and he cannot jump again. Once you’re jumping, that’s it—you better hope you did it right! Of course, this is one of the skills required to play Manic Miner.
The Jump Parabola
We learned above about the ballistic trajectory, but how would we go about creating something like that without the technique described at the beginning of this episode? The answer is quite simple and quite cheaty, but because of the movement of Miner Willy, it works perfectly for us. We will use a sine wave. Not all of a sine wave, just 180 degrees of a sine wave, which creates an appropriate parabola to work with. To make things easier, though, we will define a full 360-degree sine wave. Let’s add the following code:
@InitMinerWilly
    dim mwan(319) : for xpos=0 to 319 : mwan(xpos) = 1 + ((xpos mod 8)/2) : next xpos
    dim jmps(359) : for ang = 0 to 359 : jmps(ang) = -(sin(rad(ang))*20) : next ang
    MWD = 0 : MWWS = 1 : MWWC = 2 : MWWCC = MWWC : MWXPOS = 16 : MWYPOS = 80
    gosub @SetOFS
    return
There is not much further to explain here, as we have been through for/next loops and arrays, but what about the sin and rad commands?
Command
Description
Sin
Calculates the sin of an angle, returning a floating point number as a result.
Rad
Converts angles expressed in degrees into radians. A radian is approximately 57 degrees.
Now we need to make sure that we adjust Miner Willy’s Y position on the screen by the jump. But, before we can do that, we need to be able to identify the state that Willy is in (hopefully not the state that we find our hero in at the beginning of Jet Set Willy!). Let’s talk a little bit about finite state machines.
What is a Finite State Machine?
This will likely be a new concept for a lot of people, but it’s really very simple. It is a mechanism for allowing something to be in exactly one of an infinite number of different states at any given time. This model can be used for many different types of applications, but it is massively used within gaming, particularly in instance-based languages such as Games Maker Studio from YoYo. They are used, amongst many other things, for indicating the state of a character—what it is currently doing.
Examples of this could be idle, walking, shooting, flying, or, in our case, jumping.
So what we can do is create a series of variables to capture Willy’s state.
@InitMinerWilly
    FALLING = 1 : JUMPING = 2
    dim mwan(319) : for xpos=0 to 319 : mwan(xpos) = 1 + ((xpos mod 8)/2) : next xpos
    dim jmps(359) : for ang = 0 to 359 : jmps(ang) = -(sin(rad(ang))*20) : next ang
    MWD = 0 : MWWS = 1 : MWWC = 2 : MWWCC = MWWC : MWXPOS = 16 : MWYPOS = 80 : MWSTATE = FALLING : MWJMPANG = 0 : MWVSPD = 0
    gosub @SetOFS
    return
We’ve defined two variables, FALLING and JUMPING, which have different values. We’ve then created a new Miner Willy variable, MWSTATE (Miner Willy State), so we can determine what our hero is currently doing. By default, because of the effect of gravity, we say that the default state of Miner Willy is falling.
Finally, we’ve created MWJMPANG (Miner Willy JumpAngle) so we know at what position in the jmps Miner Willy is currently in, and finally MWVSPD (Miner Willy Vertical Speed) so we can ultimately make Willy drop to the floor (this is simulating our gravity, if you like). We’ll use this later on, but it’s better to get the definition out of the way.
We’ve got our different states, and we’ve assigned the default to Willy. Our next task is to actually make Willy jump. This happens when the fire button on the joystick is pressed, so we need to make a small amendment to our joystick routine, but there is also some setup that we need to do, such as signaling that Willy is jumping, etc. Let’s create a new subroutine first.
As you can see, we are setting MWSTATE to be JUMPING, setting our current jump angle (MWJMPANG) to be 2, and resetting the vertical speed (MWVSPD) so that we are not moving vertically – We’ll explain that later on!
Let’s read the joystick fire button and call the @StartJump subroutine.
@ReadJoystick
    JL = jleft : JR = jright : JF = fire : JSTCK = (JL or JR)
    if JF then gosub @StartJump
    if not(JSTCK) then MWSPD = 0 : else MWSPD = MWWS : if JL then MWD = -1 : gosub @SetOFS : else MWD = 0 : gosub @SetOFS
    return
Nothing is going to happen if we run our routine now, because we are not using any of the new variables we have just created. So let’s affect Miner Willy with our jump logic.
@DisplayMinerWilly
    if MWSTATE = FALLING then MWVSPD = 1 : else MWVSPD = 0 : MWJMPANG = MWJMPANG + 2 : MWSTATE = JUMPING : if MWJMPANG > 180 then gosub @ResetJump
    if MWD = 0 then MWXPOS = MWXPOS + MWSPD : else MWXPOS = MWXPOS - MWSPD
    sprite 1,MWXPOS,MWYPOS,mwan(MWXPOS) + MWOFS
    return
We’re saying here that if Miner Willy is FALLING, then his vertical speed (MWVSPD) is 1, so as to move him down the screen. else, we set his vertical speed to 0, increase the jump angle by 2, and set his state to JUMPING. We then check MWJMPANG and if it has reached 180 degrees, we call the @ResetJump subroutine to stop Willy from jumping.
The @ResetJump subroutine looks like the following:
In this routine, we simply reset Miner Willy’s state to FALLING and clear the MWJMPANG.
Finally, we can use all of the above to affect the Y position of our hero:
@DisplayMinerWilly
    if MWSTATE = FALLING then MWVSPD = 1 : A = MWYPOS : else MWVSPD = 0 : A = MWYPOS + jms(MWJMPANG) : MWJMPANG = MWJMPANG + 2 : MWSTATE = JUMPING : if MWJMPANG > 180 then gosub @ResetJump
    if MWD = 0 then MWXPOS = MWXPOS + MWSPD : else MWXPOS = MWXPOS - MWSPD
    sprite 1,MWXPOS,A,mwan(MWXPOS) + MWOFS
    return
So, you can give that a run, and you will see that Miner Willy now jumps when we press the fire button. BUT… and it’s a big but… You can press fire again while Willy is jumping, and it all goes wonky. Not only that, but you can change directions! Argh! Don’t panic; it’s easily solved. We can just use our state engine on the joystick input routine and bypass some stuff—whoop!
@ReadJoystick
    if MWSTATE = JUMPING then goto @EndReadJoystick
    JL = jleft : JR = jright : JF = fire : JSTCK = (JL or JR)
    if JF then gosub @StartJump
    if not(JSTCK) then MWSPD = 0 : else MWSPD = MWWS : if JL then MWD = -1 : gosub @SetOFS : else MWD = 0 : gosub @SetOFS
@EndReadJoystick
    return
So, what we are doing here is essentially saying: If Miner Willy is jumping, then I don’t want to read the joystick any more and change our speed or jumping variables, so just goto the @EndReadJoystick label instead. Once you’ve jumped, you’d better hope that it was the right jump to make.
Let’s Apply Gravity
We’ve not done anything with our gravity as of yet, so we can do that now. Remember, gravity continuously pulls an object down, so it’s really very simple to implement. Let’s create a new subroutine to apply gravity to our MWYPOS.
@ApplyGravity
    MWYPOS = MWYPOS + MWVSPD
    if MWYPOS > 80 then MWYPOS = 80
    return
Literally, all we are doing here is adding Miner Willy’s vertical speed to his Y position. By doing it this way, we can simply change the value of MWVSPD to 0 when he hits something. I’ve put a quick if statement in there on the MWYPOS variable just so that we can stop Willy from falling off the bottom of the screen. We’ll remove that once we get a background and some collision detection in place.
All that is left is to apply the gravity:
@DisplayMinerWilly
    gosub @ApplyGravity
    if MWSTATE = FALLING then MWVSPD = 1 : A = MWYPOS : else MWVSPD = 0 : A = MWYPOS + jmps(MWJMPANG) : MWJMPANG = MWJMPANG + 2 : MWSTATE = JUMPING : if MWJMPANG > 180 then gosub @ResetJump
    if MWD = 0 then MWXPOS = MWXPOS + MWSPD : else MWXPOS = MWXPOS - MWSPD
    sprite 1,MWXPOS,A,mwan(MWXPOS) + MWOFS
    return
And there we go! Miner Willy walks and jumps now! Yippee.
And so, we’ve reached the end of another exciting episode of Let’s Remake Manic Miner. As always, the source files can be found in the GitHub repository.
In our next episode, we will start to look at how to build an environment for Miner Willy to walk around in. Until then… Happy STOSing.
Welcome to episode four of our Let’s Remake Manic Miner series. Today we are going to look at animating Miner Willy as he moves around the screen.
How We Normally Do It
Animating characters is usually straight-forward; in fact, you could say it’s probably one of the easiest things you can do with your sprite. Effectively, you just need to cycle around a series of images while your character is moving, and then when the character stops, you stop cycling around the image. If the character changes direction, you reset the animation frame for the start animation of the new direction.
So, let’s do that, shall we? No, we won’t do that, because that is not how Manic Miner works, it does something that I never really thought of before, but it’s quite a clever trick that Matthew Smith did, and it saves a bunch of processing time too! Let’s ask ourselves…
What Would Matthew Smith Do?
I’ve spent long hours looking at how Miner Willy is animated, and it had me puzzled for a while. I tried various different things, but I could just not get it to look right. After a bit of a break and doing some other things and thinking, my mind came to a simple conclusion: Willy’s animation frame is tied to his X position on the screen. This is why he keeps animating when jumping, and also why, no matter how you’ve moved about on the screen previously, you always end up with the same frame of animation when Miner Willy is in the same position.
You can try this out for yourself by playing the Central Cavern level and walking left to the brick wall. Miner Willy will stop mid-walk and not animate any further. Move around the screen, jump, do random things—when you walk back to the left, the frame of animation is always the same! Try some other things too, such as walking off the first platform. Miner Willy will always be in exactly the same frame of animation. If we were to use the standard method as described above, this would most certainly not be the case. Therefore, his animation frame is tied to his X position!
Now, this sounds like a bit of a cop-out, but in fact, it’s absolute genius! If you base the character’s animation frame on their current X position, there are no complex animation calculations such as counting frames or resetting when you change direction—none of that! Therefore, you are saving lots of CPU instructions and making your game run faster, which, when working with something like the ZX Spectrum, the more you can squeeze out of the CPU, the better. So, when I say genius, that’s exactly what it is.
How Do We Do This In STOS?
So, how do we replicate this within STOS? Well, it’s pretty simple, really; we just define an array that holds the correct animation frame to show at the different horizontal positions on the screen. We know that our Miner Willy sprite has just four frames of animation, and we know that sprite #1 is walking to the left. Therefore, our Miner Willy sprites are as follows:
Frame Number
Description
1
Miner Willy walking left – Frame 1
2
Miner Willy walking left – Frame 2
3
Miner Willy walking left – Frame 3
4
Miner Willy walking left – Frame 4
5
Miner Willy walking right – Frame 1
6
Miner Willy walking right – Frame 2
7
Miner Willy walking right – Frame 3
8
Miner Willy walking right – Frame 4
So, what we can do is predefine which frames to use and store them in an array so that we don’t have to be calculating which frames to be using all the time. We can then use the direction variable (MWD) to adjust the frame accordingly by an offset. The fewer calculations we have to perform per frame, the quicker our game logic will run.
Let’s modify our initialisation routine so that we precalculate the frames that represent each X position on the screen.
@InitMinerWilly
    dim mwan(319) : for xpos=0 to 319 : mwan(xpos) = 1 + ((xpos mod 8)/2) : next xpos
    MWD = 0 : MWWS = 1 : MWWC = 2 : MWWCC = MWWC : MWXPOS = 16 : MWYPOS = 80
    return
We’ve introduced some new commands there, so let’s walk through them and determine what they are doing.
Command
Description
dim mwan(319)
Here we are setting up array MWAN (Miner Willy ANimation) and we are telling it that we want enough storage to hold 320 values. When defining arrays in STOS the first value is always 0, so in the instruction here we are defining values 0 to 319, so, 320 spaces.
But what is an array? Think of an array as a list of values that can be accessed by an index number. In our case we have said we want 320 indexed values to be stored. If we tried to store any more, STOS would generate an error message as in affect, we would be overwriting other memory.
Arrays can be single or multi-dimensional, but we won’t get into that just yet. Our example here is a single dimensional array.
for xpos=0 to 319
Here we are starting a for/next loop that is going to generate values between 0 and 319 within the XPOS variable. This value represents the number of pixels across the screen.
mwan(xpos) =
We are addressing our array here, and passing the XPOS variable as the value index, this accessing indexes 0 to 319.
1 + ((xpos mod 8)/2)
We’re doing a little bit of mathematics here on on our XPOS value, and introduced the MOD command. MOD returns the modulus of a value, that is to say it’s used to divide two numbers and only return the remainder. In this instance we are dividing XPOS by 8 and returning the remainder.
But why are we doing this? Well, the XPOS value as we know will always be increasing in value from 0 to 319. By using the MOD command, we can ensure that we always get a calculated value of between 0 and 7, no matter what the value of XPOS is.
We then divide that value by 2, which results in a value of 0 to 3.
We add 1 to that result so we end up with a value of 1 to 4 – or an animation number – whoop!
next xpos
Here we are simply finishing off the for/next loop. All instructions between the for and the next will be executed the number of times specified in the for command.
Our MWAN array now contains the appropriate animation frame to use based on the X position on the screen. We now need to update our sprite command to make sure we are using the appropriate frame.
Let’s build and run our project to see what we have. If you move your joystick left/right now, you should see Miner Willy walk – look at him go! But, one major draw back, he’s always facing to the left. That’s because our frames of animation we have calculated only register frames 1 to 4. We need a way to make him face to the right. Remember that MWD variable we created previously? That’s where this comes in, because we can now use that to create an offset to point to the correct animation frame.
We could do some complex mathematics here to transform the frame number to the right place, but complex maths means more processor time, so let’s just keep it simple and quick instead. We will create an offset flag that holds a number that needs to be added to the frame. If Willy is walking to the left, then the offset will be 0. If Willy is walking to the right, then the offset will be 4. When we add this offset to the animation frame number, Willy will be facing in the correct direction. Ok, so let’s make a few code changes:
Firstly, we create a new subroutine called @SetOFS, this is what we will use to set what our frame offset should be, using the MWOFS (Miner Willy OFSet) variable.
@SetOFS
    if MWD = 0 then MWOFS = 4 : else MWOFS = 0
    return
next, we need to call this new subroutine from a couple of places.
@InitMinerWilly
    dim mwan(319) : for xpos=0 to 319 : mwan(xpos) = 1 + ((xpos mod 8)/2) : next xpos
    MWD = 0 : MWWS = 1 : MWWC = 2 : MWWCC = MWWC : MWXPOS = 16 : MWYPOS = 80
    gosub @SetOFS
    return
@ReadJoystick
    JL = jleft : JR = jright : JF = fire : JSTCK = (JL or JR)
    if not(JSTCK) then MWSPD = 0 : else MWSPD = MWWS : if JL then MWD = -1 : gosub @SetOFS : else MWD = 0 : gosub @SetOFS
    return
As you can see on the second section of code, we are calculating the new offset when MWD changes.
And finally, we now need to utilise the offset on the Miner Willy sprite.
Let’s build our project and see what we have. Success! Miner Willy is walking in the direction he is facing. Well, he’s running actually, so we will need to slow that down a little bit, but we can tackle that later.
For now, that’s the end of this episode. Check in for the next episode where we will be making Willy jump. Remember, you can find the various episode source codes and assets on the Manic Miner Github page.
So, we want to make Miner Willy move then? Well, we can’t do that unless he’s shown on the screen. In our previous episode, we created our game loop, and so we need to make an adjustment to that loop in order to call our display routine for Miner Willy.
repeat
    gosub @DisplayMinerWilly
    gosub @WaitVBL
until false
For our subroutine, we will keep it simple for the moment and just place Miner Willy at a specific location on our screen.
@DisplayMinerWilly
    sprite 1,100,100,1
    return
We have already learned about the label and the return command in previous episodes, but what else are we doing here? We’ve introduced a new command:
Command
Description
sprite 1,100,100,1
This is the official definition of the sprite command as written in the STOS manual:
SPRITE n,x,y,p
Displays sprite number "n" on the screen at coordinates "x" and "y".

"n" is the number of the sprite, which can range from 1 to 15. It is this number that will be used to identify the sprite in any subsequent calls to the MOVE and the ANIM instructions.

"x" and "y" are the coordinates of the point on the screen where the sprite is to be drawn. Unlike normal screen coordinates, these can take NEGATIVE values. The "x" coordinate can vary from -640 to +1280, and the "y" coordinate from -400 to +800. This allows you to move a sprite off the screen without causing an error.

"p" specifies which of the images in bank 1 is to be used for a particular sprite. The only limit to the number of these images is the amount of available memory.

Each sprite has an invisible handle through which it can be manipulated, called a "Hot Spot". Whenever we draw a sprite, we always specify its coordinates in terms of the position of this point on the screen. As a default, the hot spot is always set to the top left-hand corner of the image, but this can readily be changed using a special option from the sprite definer accessory.
Phew! There is quite a bit to take in there, but essentially what it is saying is that we have a total of 15 sprites that STOS can deal with. When we create a sprite, we have to tell STOS which number of the 15 sprites we are creating: “n”, as it calls it in the manual. We have assigned sprite number 1 to Miner Willy.
Next, we are specifying where to show Miner Willy on the screen—his x and y coordinates. We have just chosen to show Miner Willy at 100,100 on the screen.
Finally, we specify which of the images we want to show—in other words, which of the image numbers from the sprite bank we have loaded. We are using 1 here, which is Miner Willy facing left.
Let’s transpile our program, load it into STOS, and run it. We should simply get Miner Willy, frame 1, at position 100,100 on the screen. It works! But now we need to make him move.
A Moving Willy
We need to define some form of mechanism to make Miner Willy move. In the ZX Spectrum version of Manic Miner, this was done purely with keyboard input. We could do the same for our game, but for ease, I’ve decided to use the joystick to control our hero. We therefore need to read some input from the joystick, which STOS has some handy routines to deal with.
Before we can do anything in terms of joystick input, we need to do some setup so we can control the position of Miner Willy. We always need to know his current x and y positions on the screen so that we can increment them as required for walking and jumping. We need to do this in a series of variables, which we will need to initialise before trying to display Miner Willy. There’s also some additional setup that we will do too but won’t use for the moment; this is to cater for the fact that we are not going to use either the sprite movement or animation routines that are built into STOS.
Let’s create a new subroutine for initialising everything we need for Willy.
There are a fair few variables there! I’ve tried to use logical naming conventions for them, but let’s go through them one by one and describe what they are used for:
Variable
Description
MWD
Miner Willy Direction
Will be used to identify the direction that Miner Willy is currently facing. MWD with a value of 0 will mean that Willy is facing to the right, and -1 will mean he is facing to the left. We use 0 and -1 for a reason, which will become clear later on.
MWWS
Miner Willy Walk Speed
This value will be used to identify the number of pixels that Miner Willy will move with each frame of animation when walking.
MWWC
Miner Willy Walk Counter
This value is an interesting one. Miner Willy is only a small chap and doesn’t walk very fast. If we were to move and animate him a single pixel every 50th of a second, he would be running the 100-metre dash across the screen. So we need to slow him down a little bit. This is where the walk-counter comes in. Let me explain a bit:
When the joystick is pushed to the right, we move Willy to the right by the number of pixels as defined by MWWS and change his animation frame. If this is happening at 50 frames per second, then it would take 6 seconds for Willy to cross the entire screen, and the animation frames 1-4 would happen 12 times in just a single second—it would be super fast.
Therefore, to slow him down, we need to introduce a counter. We can use this to control the speed by decrementing the counter and then only moving and animating when it reaches zero. At which point we reset the counter back to its maximum value. MWWC holds the default value of the counter that can be used to change the speed and reset our main counter (see below).
MWWCC
Miner Willy Walk Counter Current
This is the current value of the walk counter. This value is decreased at each VBL, and when it reaches zero, we will update Miner Willy’s position and current animation frame. We then reset this value back to the default setting (MWWC) for it to happen all over again.
MWXPOS
Miner Willy XPOSition
Holds Miner Willy’s current X position on the screen. It is this value that is increased to move him to the right and decreased to move him to the left. We’re giving him a default X position of 16 to start with.
MWYPOS
Miner Willy Y POSition
Holds Miner Willy’s current Y position on the screen. It is this value that is increased to move him down the screen and decreased to move him up. We’re giving him a default Y position of 80 to start with.
MWSPD
Miner Willy SPeeD
We will use this variable to hold the current speed that Miner Willy is moving horizontally. More about this later.
We now need to make a call to our initialisation routine and also update our sprite command so that we are not forcing Willy to always be at position 100,100 on the screen. So we do that after we have loaded our assets. We may need to move this later on, but it serves it’s purpose here for the moment.
gosub @LoadAssets
gosub @InitMinerWilly
Now, we need to update our sprite command so that we are using the newly created MWXPOS and MWYPOS variables.
OK, let’s transpile our program, load it into STOS, and see what we have. You should now see that Miner Willy has moved positions. He’s further to the left and higher up the screen. That means that our sprite positioning with MWXPOS and MWYPOS is working, and we can begin to manipulate those with the joystick input.
Joystick Input
To get Miner Willy to move, we need to read the joystick data stream. STOS provides joystick input commands, so we will use them. Let’s go ahead and create a new function that we can call whenever we want to read the joystick.
@ReadJoystick
    JL = jleft : JR = jright : JF = fire : JSTCK = (JL or JR)
    return
Let’s breakdown the calls that are being used:
Command
Description
JL = jleft
Here we are reading the value of the jleft command and storing it in our variable JL. If the player is pushing the joystick left, then JL will be TRUE, otherwise, it will be FALSE.
JR = jright
As with the jleft command, we are reading if the player is pushing the joystick to the right. Again, TRUE or FALSE will be returned into JR.
JF = fire
You guessed it, we’re reading the status of the fire button. JF will be TRUE if fire is being pressed, and FALSE if not. We are going to use fire to ultimately make Miner Willy perform a jump.
JSTCK = (JL or JR)
This is an interesting one. What we are doing here is creating a third variable that identifies if the joystick is being pushed either left (JL) or right (JR). The variable JSTCK will therefore contain TRUE if we are pushing the joystick in any horizontal direction. With this variable set, we can then start to perform operations that should only be performed when Miner Willy is moving.
The above is simple enough, but why are we storing the state of the joysticks in variables? Well, we do this for a couple of reasons. Essentially, the input from the joystick is a continual stream of data being thrown at STOS. If we used the direct joystick commands throughout our source code, we could end up with some strange results as the joystick states may be different whilst our code is executing. For example, making Miner Willy do something at a point in which he shouldn’t be doing it. In addition to this, we would force STOS to perform additional reads and therefore consume more processor time at each call. By storing the values within variables, we only read the joystick once per VBL and therefore save a bunch of processing power.
Now we need to make sure that we call the routine to get the values from the joystick. We must do this within the game loop, so add the following code:
repeat
    gosub @ReadJoystick
    gosub @DisplayMinerWilly
    gosub @WaitVBL
until false
Applying Movement to Willy
We’ve got Miner Willy all set up now, and we have our variables available for changing his X and Y positions on the screen. We’ve also started to feed joystick input into our JL, JR and JF variables. Now that we’ve got that in place, we need to make Miner Willy move. Earlier, we created the MWSPD variable to hold the current speed at which Miner Willy is walking. It is this variable that we manipulate in order to signal that movement is to occur. We do this within the @ReadJoystick section of code.
@ReadJoystick
JL = jleft : JR = jright : JF = fire : JSTCK = (JL or JR)
if not(JSTCK) then MWSPD = 0: else MWSPD = MWWS : if JL then MWD = -1 : else MWD = 0
return
Let’s break down that new line of code that we have just added in:
Command
Description
if not(JSTCK)
What we are doing here is testing that the JSTCK variable is set to FALSE. This could be done in a couple of ways. I have chosen to use “not”, which inverses the content of the variable. If you remember earlier in the series we spoke about how all conditions return TRUE or FALSE. Well, that what this does, if the value of JSTCK is FALSE the “not” command inverts it and therefore the tested condition is TRUE, and vice-versa if JSTCK was TRUE.
We could also have done if JSTCK = false and again, that creates a condition that returns TRUE or FALSE.
Hope that makes sense!
then MWSPD = 0
If JSTCK is FALSE, then we set the current speed of Miner Willy to zero. There is no input on the joystick, and therefore Miner Willy is not moving and his movement speed is zero.
else
The else clause of the if statement tells us what to do when the if condition does not equate to TRUE. Here we are saying, if JSTCK is TRUE (i.e. we have joystick input), then we need to execute the following code.
MWSPD = MWWS
We set the current walking speed of Miner Willy to the default walking speed that has been defined.
if JL then MWD = -1
Is the joystick being pushed to the left? If so, then set the walking direction (MWD) to be -1.
else MWD = 0
Else, the joystick must be pushed to the right, so set the walking direction to 0. We can make this assumption here as the initial check on the JSTCK variable told us that either left or right was being pushed. Therefore, if it’s not left (JL) as per the if check, then it can’t be anything but being pushed to the right.
We now know in which direction Miner Willy is facing (MWD) and at what speed he is moving (MWSPD). This information can now be used to update the MWXPOS variable accordingly. We’ll add this code into the @DisplayMinerWilly section.
Welcome to the STORM Developments/GBP Software STOS basic and compiler extensions. Many thanks for your interest in this program, and thanks also for your registration fee. Your details have been placed in our registration database, allowing us to keep track of registered users and also send free program updates to those who want them.
We are sure that you will enjoy using the compiler version of the extension, and also hope that your programs will now be enhanced because of the use of GBP.
We would like to hear from you in the future to keep in touch with how you are getting on, solve any problems that you might have, or listen to any ideas that you may have about future extensions. Please do not hesitate to get in contact with any of the GBP team.
Thanks
Before we begin, I and the rest of the GBP team would like to thank a couple of people and publishers who were a great help during the writing of this extension.
Billy Allen: Thanks for Misty & The Missing Link, it really inspired us to get GBP finished. Many thanks for the letters, and I hope that I shall hear from you quite soon.
Steve Jarrett: Thanks for all the comments about the extension.
Rick Dunlop: Again, thanks for taking the extension in, and I hope you didn’t mind me sending you a new version every week. How are you going with the PC? What’s up?? Are your routines not fast enough to work on an ST????? (joke.. I think!)
Stephen Hill: Thanks for creating such a wonderful book called “The Game Maker’s Manual”. It was really useful while I was originally coding and finally debugging the extension. I hope you write a follow-up.
Sigma Press: Thanks for publishing Stephen’s book!
Abacus Software: Thanks for publishing the “Atari ST Internals” book. It should play a major part in any assembler or ST programmers book collection!
Disclaimer
Although this extension has been tested to it’s full abilities, GBP Software or any member of GBP Software cannot be held responsible for anything that may happen to computer equipment of any kind during the use of the extension. Basically, you’re on your own if it does go wrong!
Copyright
These extensions and accompanying documentation are the SOLE copyrights of GBP Software, and may not be ripped off, copied, sold without our prior knowledge, or be changed in any way, including the documentation. It is an offense to copy the compiler extension without written permission from GBP Software. The BASIC extension and the DOCUMENTATION are shareware and can be copied freely. The Shareware release may be used for a 30-day period before registration becomes necessary.
Remember, copying copyrighted material is a criminal offense. Please register this product to make sure that GBP Software will continue to produce great-quality STOS extensions in the future.
Thank you for your attention. Neil Halliday.
The Commands
Well, here’s the bit you have all been waiting for: the commands! I must apologise at this point, as all the commands are not in any sort of logical order, but I will try to keep them together. I will also try to include demo programs where applicable.
NOTE: All addresses that are mentioned in this extension must be passed as actual addresses, as the routine will not work by simply passing the bank number. i.e., the extension will bugger up if you use…
Eplay 10,length(10),0,0,1
As the routine will play from memory address 10 instead of bank 10. So you will have to call it like this…
Eplay start(10),length(10),0,0,1
Ok??? For more information about that, consult your STOS manual.
MISCELLANEOUS COMMANDS
LIGHTS ON
Syntax: Lights On
Description: This is a very nice command that will turn on the drive lights for disk drives A & B. This command will allow you to produce effects that have been seen in demo screens where the drive lights pulse to a piece of music and has also been seen recently at the beginning of Crack Art.
LIGHTS OFF
Syntax: LIGHTS OFF
Description: The opposite of the last command. You have read the last command, haven’t you? As mentioned about pulsing the drive lights to music, here is the routine:
10 dreg(0)=1 : call 10 : rem * Call music Init
20 loke $4d2,start(10)+8 : rem * Install on VBL
30 if psg(8)>12 then lights on : else lights off
40 wait vbl : goto 30
50 :
60 loke $4d2,0 : bell : rem * Turn music off
The above routine will work with a MAD MAX music file loaded into bank 10, but if you don’t have any MAD MAX music you can use the normal STOS music (VERY CRAP!) by making these amendments:
10 rem * Routine to flash lights to CRAP MUSIC!
20 music 1
For more information about the PSG command, turn to your manual pages 265 & 266 (Ha! That will fool all you people who are using a copy of STOS!!! Buy the original, you SAD people!).
PREADY
Syntax: X=PREADY
Description: This function tells you if the printer connected to the Parallel port is online or not. The variable X will contain the status of the printer, and can only take 2 forms.. TRUE (-1) if the printer is on line and ready to receive data, or FALSE (0) if the printer is set to anything else. Try the following small program to test this out:
10 X=pready
20 if X then bell
30 goto 10
This program will test the printer, and if it is online, it will sound the STOS bell repeatedly; otherwise, if your printer is offline, nothing will be heard. For more information about true and false statements, consult your STOS manual, page 227.
EVEN
Syntax: X=EVEN(NUM)
Description: The even command will return if the input value is even or odd. The output variable X will contain true if NUM was even or FALSE if NUM was odd:
10 input A
20 if even(A) then bell : else boom
SETPRT
Syntax: X=SETPRT(VAR)
Description: This function allows the printer configuration to be set. The variable VAR is a bit vector with the following meaning:
Bitnumber
Off (0)
On (1)
0
Dot Matrix
Daisy Wheel
1
Monochrome
Colour
2
Atari Printer
Epson or Compatible
3
Test Mode (DRAFT)
Print Mode (NLQ/LQ)
4
Centronics Port
RS-232 Port
5
Continuous Sheet
Single Sheet
6-14
Reserved
Reserved
15
Always 0
Always 0
As an example, the following statement would set the printer to:
Dot Matrix Type
Monochrome
Epson or Compatible
Test Mode (DRAFT)
Centronics Port
Continuous Sheet
X=setprt(%000100)
The bit number, as you will have noticed, is binary, with bit 1 being on the far right. This binary number can be substituted for the decimal equivalent, so the command:
X=setprt(4)
Is equivalent to:
X=setprt(%000100)
The printer’s parameters can be read by passing -1 as the input variable. The value will be returned as X.
SPECIAL KEY
Syntax: X=SPECIAL KEY(I)
Description: The special key command sets or returns the current status of the special keys (i.e., Shift(s), Alt, Ctrl, and Caps). The status can be set by passing variable I as a positive integer, and by passing I as -1, the status can be read.
10 print "Current Status :"; special key(-1)
The value returned by special key is an 8 bit value that is read in the following way:
Bit
Meaning
0
Right Shift Key
1
Left Shift Key
2
Control (CTRL) Key
3
Alternate (ALT) Key
4
Caps lock
5
Right Mouse Button (CLR/HOME)
6
Left Mouse Button (INSERT)
7
unused
If the bit is set, then the button is active.
HCOPY
Syntax: HCOPY X
Description: The annoying thing about STOS is the fact that no matter how good your games, demos etc.. are, they can always be interrupted by the system HARDCOPY command (ALT & HELP). Well, that is no longer the case. This command will turn off and turn on the system Hardcopy! By passing X as 1, we turn ALT & HELP on, and by passing X as 0, we turn ALT & HELP off!
10 hcopy 0 : rem Turn HARDCOPY off
20 wait key
30 hcopy 1 : rem Turn HARDCOPY on
File Commands
D CRUNCH
Syntax: D CRUNCH ADDR
Description: The D CRUNCH command allows you to unpack files compacted with the most popular packers around (up to now). By passing ADDR as the address of your compressed data, it will be decompressed by the recognised file format. The extension can unpack several different formats, which will be shown in a little while, but before we do, a little word of warning! The de-pack routines are a0 -> a0 routines, which means that any compressed data will be overwritten during decompression. It also means that memory banks will have to be reserved for the original file length of the data; otherwise, you face overwriting some data that you may need and, in some cases, even crashing your ST.
PAKTYPE
Syntax: X=PAKTYPE(ADDR)
Description: All recognised packer formats have a special header to tell them from one another.. This command will return in variable X, what packer the data at address ADDR was compressed with. If the packer type is not recognised then the return value will be 0. Otherwise the value stands for:
Value
Packer
1
Speed Packer 2
2
Atomik v2.5
3
Ice v2.11
4
Automation v5
5
Ice v2.40
6
Fire v2.0
7
Speed Packer 3
PAKSIZE
Syntax: X=PAKSIZE(ADDR)
Description: This command returns the uncompressed size of the packed file located at address ADDR.
FSTART
Syntax: X=FSTART(N,ADDR)
Description: This command is used in conjunction with a GBP file bank, and returns the position in memory of file N, located in the GBP filebank that can be found at address ADDR. A GBP bank allows many files to be stored in just one memory bank, which programmers will understand that means loads of data loaded, and still loads of banks left.
FLENGTH
Syntax: X=FLENGTH(N,ADDR)
Description: This command will return the length of file N, found in the GBP bank located at address ADDR.
FOFFSET
Syntax: X=FOFFSET(N,ADDR)
Description: This command returns the offset of the file N, compared with the start of the GBP file bank. i.e file two may by 1024 bytes from the start of the bank. NOTE: The GBP bank builder accessory can be found along with the extension files.
Graphics Commands
FASTWIPE
Syntax: FASTWIPE ADDR
Description: This is a very fast version of the STOS cls command. It will clear 32000 bytes from the address specified by ADDR. It can be used to clear memory banks or screen addresses (eg. physic). However if you are clearing a memory bank you must pass the parameter as the start of the bank. e.g..
10 fastwipe start(BNK)
Where bank BNK is a reserved screen bank, if you just want to clear a screen address then substitute start(BNK) for the address of the screen. e.g..
10 fastwipe physic
You may have seen the wipe command in the The Missing Link extension? Well, no we haven’t ripped/stolen the routine, it was mine in the first place and I sent it to the chaps, I never got credited for it (snarl), anyway.. This new version is even faster (Shove that up your jumper Top-Notch! haw haw!).
ELITE UNPACK
Syntax: ELITE UNPACK ADDR1,ADDR2
Description: This command will allow you to unpack a Degas Elite compressed PC? pictures. You must set up a normal STOS screen bank to hold the resulting unpacked picture.This routine SHOULD work in all three resolutions, but I haven’t tested it yet. Try this small routine:
10 key off : curs off : mode 0 : hide
20 reserve as screen 10
30 reserve as work 11,(length of PC? file)
40 bload "FILENAME.PC?",11
50 elite unpack start(11),start(10)
60 screen copy 10 to physic
70 get palette(10)
This will unpack the picture from bank 11 to bank 10, and then display it on the screen. Once the picture has been unpacked, the palette can then be grabbed in the normal way. Screens can also be unpacked directly to the screen, i.e.
elite unpack start(11),physic
The palette for the picture can then be installed by using the command:
get palette(physic)
TINY UNPACK
Syntax: TINY UNPACK ADDR,ADDR2
Description: This command does exactly the same as the ELITE UNPACK command, except that it will unpack a TINY compressed image.
CA UNPACK
Syntax: CA UNPACK ADDR,ADDR2
Description: Again this command is the same as ELITE UNPACK & TINY UNPACK, although this routine will packed an image file saved in the Crack Art format (CA?).
CA PACK
Syntax: X=CA PACK ADDR,ADDR2,PAL,MODE Description: This command is to be used in conjunction with the CA UNPACK command, and will actually create a compressed Crack Art image file from a standard STOS screen bank. ADDR is the source image, ADDR2 is the destination for the compressed image, PAL is the address of the palette data to be used, which will usually be ADDR+32000, and MODE is the pictures screen resolution (0=Low, 1=Medium, 2=High). The value returned is the length of the compressed picture file. This routine should help you sort this out:
10 reserve as screen 10
20 L=ca pack physic,start(10),physic+32000,0
30 bsave "picture.ca1",start(10) to start(10)+L
This routine will compress the current physical screen into bank 10, and then save it. The variable L contains the compressed length of the image file.
SETPAL
Syntax: SETPAL ADDR Description: The SETPAL command will install a new palette that is located at address ADDR. It is useful for storing large palette changes in a memory bank, and then setting them when every they are needed. The format for the data is just the standard degas format, in that it is 16 words, each word representing the colour 0 – 15.
10 reserve as work 10,32 : mem=start(10)
20 restore 80 : for lp=0 to 15 : read(x)
30 doke mem,x : mem=mem+2
40 next lp
50 :
60 setpal start(10) : wait vbl : end
70 :
80 data $000,$111,$222,$333,$444,$555,$666,$777
90 data $000,$111,$222,$333,$444,$555,$666,$777
This routine will copy some values into memory bank 10, and the set the palette from it.
BCLS
Syntax: BCLS ADDR,SCAN Description: The BCLS command, will erase a set amount of scanlines on any desired bit plane of the screen. The address of the screen is passed in ADDR, and the number of scanlines to erase is passed in the variable ADDR:
10 bcls physic,10
This will clear 10 scanlines on plane 1 of the physical screen. The other planes of the screen can be selected by increasing the screen address by 2.
Description: The mirror command is quite powerful, in that it can mirror parts of the screen, in three ways.. Normal, Halved or Doubled. The mirror option is passed in the OPT variable, and can take the form:
1 = Normal 2 = Half Copy 3 = Double Copy
Variable ADDR is the source address of the image, and SYPOS is the source Y pixel offset. ADDR2 is the destination screen address, and DYPOS is the destination Y pixel offset. NUM is the number of lines to mirror. i.e.
10 mirror 1,physic,0,physic,100,32
This will mirror the STOS key box to the middle of the screen… Try putting it into a loop, and see what happens when you move the mouse over it!
STE Commands
DAC VOLUME
Syntax: DAC VOLUME VOL
Description: This command will set the main volume of the STE sound output to VOL. The input value can take the form 0 – 40 (40 being the loudest).
10 rem ** STE fade out
20 for LP=40 to 0 step -1
30 for LP2=0 to 15 : wait vbl : next LP2
40 dac volume LP : next LP
TREBLE
Syntax: TREBLE TREB
Description: This command sets the amount of treble that is output from the STE sound. TREB can take the form 0 – 12 (0 = -12dB, 6 = 0dB, 12 = +12dB).
BASS
Syntax: BASS BAS Description: Same as above, but sets the amount of bass instead.
EPLAY
Syntax: EPLAY STRT,LENGTH,SPEED,MODE,PLAYMODE Description: EPLAY allows hardware sample playing on STE machines, or machines that have the extended sound capability. STRT is the start address of the sample, and LENGTH is the length of the sample. SPEED variable sets the replay speed of the sample, which can be:
The MODE variable sets mono/stereo playback of the sample.. 0 = stereo, 1 = mono. And finally, PLAYMODE can be.. 0 = stop, 1 = play once, 3 = loop forever.
Although the sample replay can be stopped using the EPLAY command, I have also added an ESTOP command, that can also be used to stop the sample.
ESTOP
Syntax: ESTOP
Description: This will stop the hardware sample replay interrupt, and stop ANY sample that is playing under STE hardware.
EPLACE
Syntax: X=EPLACE
Description: This command does the same as the SAM PLACE command that already exists in STOS, however, it returns the address in memory that is currently being played by the STE hardware. It can be used for doing all sorts of nice effects including frequency meters or oscilloscopes:
10 rem ** Oscilloscope routine
20 key off : curs off : hide : mode 1
30 :
40 eplay start(10),102400,1,0,3 : rem ** Play sample, looping
50 :
60 repeat : fastwipe physic
70 for LP=0 to 50 : X=peek(eplace)
80 if X>128 then X=X-255
90 X=X/8 : plot LP,100+X,1 : rem ** Plot sample byte
100 next LP
110 wait vbl : until false
JAR
Syntax: X=JAR Description: This command will return if a “Cookie Jar” exists on the computer. If a “Cookie Jar” does exist then true (-1) will be return, else 0. This command is to be used in conjunction with the following command:
COOKIE
Syntax: X=COOKIE(STR$)
Description: This command will read the information on the cookie STR$. STR$ must be passed as one of the official Atari Cookies, otherwise no value will be return. A list of all the Cookies and return values follow:
Name
Value
_CPU
The number here is the decimal value of the last two digits of the processor present in the machine, indicating which CPU of the 68000 family it is: 00,10,20,30. For instance the value 30 represents 68030 processor
_VDO
The high word of this cookie contains a number from 0 to 2 which indicates what type of video shifter is fitted:
0 = Standard ST video shifter 1 = STE video shifter 2 = TT Graphic chip
_SND
Here it is the bits which tell us about the sound hardware. Bit 0 set indicates the presence of the Yamaha sound chip, bit 1 of the DMA sound chip.
_MCH
This cookie also uses the high word, so that the low word can be used for version changes, and the value describes the overall machine:
0 = Standard ST 1= STE 2 = Mega ST 3 = TT
_SWI
This cookie is used to indicate the positions of the configuration switches on Mega STE’s and TT’s. At present these switches are unused.
_FRB
This longword value will be the address of the FASTRAM buffer, or 0 if no FASTRAM buffers are fitted. This cookie is not found on normal ST & STE machines.
10 if jar then X=cookie("_CPU")
20 print "You have a 680";using "##";x;" Processor"
XPEN
Syntax: X=XPEN Description: This command returns the x screen position of the STE light pen/gun.
YPEN
Syntax: Y=YPEN Description: This command returns the y screen position of the STE light pen/gun.
10 repeat
20 if fire then plot xpen,ypen : shoot
30 until false
That’s All Folks!
Yes, that’s all the commands in this great extension.. So go away and have some fun using them.
Bonus!
You may have noticed that there is an extra basic extension on the disk. Well it’s the follow up extension.. GBP II, and this time it’s going to be deadly. The extension is very much like the blitter extension, being in a very early stage. There is no documentation as of yet (it is currently being written). I will however go over a few of the command within this text file so that you can get the feel of the extension and get to use it a little bit.
The extension itself is primarily for use on STE machines, as most of the command are based around the specific hardware. Although some commands will actually work on older ST machines, but it is not really worth running. The commands themselves range from accessing an Atari powerpad/Jaguar controller (both ports!). Centronics/Parallel joystick routines, screen savers, and hardware scrolling.
Credits
Coding and Research : Neil Halliday Some Commands : Bruno Azzara Ideas and Design : Neil Halliday, Bruno Azzara & Geoff Harrison Documentation: Neil Halliday Demo Programs : Neil Halliday
Other GBP Products
Look out for these other exciting products from GBP, available now from all good public domain libraries.
Slider – a brilliant PD sliding puzzle game with 3 levels. Rubik’s Magic Strategy – A PD conversion of the brilliant Rubik’s Magic Strategy Go Moku – A great conversion of the ancient Japanese board game. This program is licenseware, and is only available through Budgie UK. Playmate II – an interrupt GEM music player that can recognise up to 28 different music formats, and allows you to play music while you work.
Contact Addresses
FOR OBVIOUS REASONS, THIS SECTION HAS NOW BEEN REMOVED FROM THE MANUAL
Neil can also be contacted through the Ad.Lib BBS.. Tel 0191-370-2659. The board is open 24 hours a day, and goes 2400-14400 baud.
Thanks for your interest in this program, and I hope you have lot’s of fun using and exploring the possibilities of STOS basic and GBP.
Neil Halliday and the rest of GBP Software team 1994/1995. GBP EXTENSION (C)GBP SOFTWARE 1992-1995.