Welcome to episode six of our Let’s Remake Manic Miner series. Today we are going to take a little bit of a break from our Manic Miner main code and instead look at how we can go about creating a level for Miner Willy to walk around in; in particular, level 1 – Central Cavern.
So, without further ado, let’s get into it…
Central Cavern
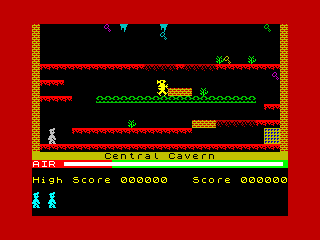
Central Cavern is the first level of Manic Miner, and it introduces a number of the required skills that need to be mastered throughout the rest of the game. We have keys to collect, an enemy to avoid, obstacles to jump over, dissolving floors to navigate, and an exit portal to get back to. Pretty much everything we will get on all the other levels, with the exception of some of the levels that also employ levers.
Decoding the Level
Before jumping straight in to creating the level, let’s breakdown what is going on in Central Cavern; this will give us a better understanding of what we need to achieve to replicate this in STOS.
Gameplay Area
Each level within Manic Miner is exactly the same size. If we take a look in detail at Central Cavern, we can see that the game blocks are all 8×8 pixels. We learnt early on in the series about the ZX Spectrums graphics processing, and so this really isn’t to be unexpected, but this does pose a problem for us within STOS – more on this later. Using the screen above, we can roughly estimate the number of 8×8 tiles that make up the screen.
Knowing that the ZX Spectrum screen resolution is 256×192, we can calculate this very easily. 256 pixels divided by 8 gives us 32 sections of 8 pixels going across the screen horizontally. We can test this theory out using the text that is displayed on the screen. Let’s count them…
“High[space]Score[space]000000[space][space][space]Score[space]000000” = 32 characters.
How do we know there are three spaces in the middle of the text? Simply put, we can look at the “Cav” bit of the word “Caven”, and that shows us the three characters. Happy days! We can confidently say there are 32 tiles horizontally across the screen.
Now we just need to confirm the number of vertical tiles. Well, we’ll just have to count them to get our number, but again, it’s straight-forward. After counting them up, I deduced that, in total, there are 16 tiles vertically. We therefore now know that our game play area, or “map,” is 32×16 tiles that are 8×8 pixels in size. In terms of pixels, that is 256×128.
We can also see that both the far left and far right of the level are nothing but walls in order to keep Miner Willy from running off the screen.
Underneath the main area are the name of the level, the air supply, scores, and the number of lives remaining. I suppose these days you would call this a HUD or status bar. We can calculate the height of the status information by simply subtracting the 128 game map size from the 192 pixels that we know the screen is in height. This gives us a status bar of 64 pixels, or 8 characters. Let’s count them to make sure…
- Name of the level = 8 pixels (1 character)
- Air Supply = 8 pixels
- Blank Space = 8 pixels
- Scores = 8 pixels
- Blank Space = 8 pixels
- Miner Willy pixels 0 to 7 = 8 pixels
- Miner Willy pixels 8 to 15 = 8 pixels
- Blank Space = 8 pixels
There we are: 64 pixels, or 8 characters.
We’ve successfully determined how the level is formatted, and we can apply that logic across all the levels because they are all the same.
Recreating in STOS
It should be easy to recreate this in STOS, yes? Well, not quite!
Whenever you are looking at a tile type system on the ST, you’re pretty much limited to 16 pixels. And we learned early on in this series that STOS uses a minimum sprite width of 16 pixels too—what a bummer!
We could make a tile set that has 16 pixels using different combinations, but that would result in a crazy amount of sprites, and as we know, sprites take memory, so if we want to limit the amount of memory we are using, that is out of the question. Using a tile set is simply not an option because of the 16-pixel limitation, so what can we do?
Well, not to put too fine a point on it, we’re going to have to do this manually and create our map from sprites. We know that we can place sprites at any x position offset, meaning we can use our 8×8 sprite images without a problem. But STOS has a limit of 15 sprites on screen at one time, and in any case, displaying that amount of sprites without overloading the CPU and destroying our frame rate is simply not possible. Therefore, we need to create an image of the level, but how do we go about that?
Luckily, STOS has this nice little command called PUT SPRITE, which is listed on page 97 of the user manual in the section entitled “Exceeding the 15 sprite limit”. It reads like this:
Exceeding the 15 sprite limit
If you’ve ever seen games like Galaxians or Space Invaders you will probably consider the 15 sprite limit to be pretty restrictive. Fortunately, although you are confined to 15 moving sprites, it’s easy enough to produce the illusion of dozens of actual sprites on the screen.
You can do this with judicious use of a part of STOS Basic commands called PUT SPRITE and GET SPRITE. These allow you to create a number of copies of a sprite at one, and then just grab the one you wish to actually move around, as and when you need them. You can add animations to these fake sprites using the SCREEN COPY and SCREEN SWAP functions.
– STOS Basic User Manual, Page 97.
Simply put, the PUT SPRITE command essentially stamps the image of the specified sprite on the screen permanently, meaning we can splat (or in the words of Jon Stock – “podge” – I like this word!) them where we want, and build up our level image in the process. We can then save the resulting image as a PI1 for use in our game. Yes, the image will take roughly 32kb, but ultimately we can compress those down, and because of the colour usage, they will shrink pretty small!
Let’s Start a New Program
As mentioned earlier, we are not going to be heading into our main game source code in this episode, so let’s create a new source file and we will work with that. To begin with, we can copy some of the code from our main game in order to make things quicker to get up and running.
rem *** Manic Miner - STOS Basic Recreation
rem *** Level Creation Tool
rem ***
rem *** Written by Neil Halliday / STOS Coders
rem ***
rem *** main.stos : main program file

key off : curs off : click off : flash off : mode 0 : hide on : auto back off : anim off : synchro off
palette $000,$777,$005,$007,$500,$700,$504,$707,$050,$070,$055,$077,$550,$770,$555,$777
SXOFFSET = 32 : SYOFFSET = 0
gosub @LoadAssets
end

@LoadAssets
    erase 1 : load "MANIC.MBK",1
    return
I’m not going to explain the above code, as we’ve already been through that, so check out a previous episode for further reading about what that is doing. Let’s just say it sets up our screen, our palette, and loads our sprites.
Level Data
When working with tile sets such as those in TOME or as provided for in the WORLD command in Missing Link, we generally have some form of nice visual editor that goes with them—well, when I say nice, let’s just say functional!
Effectively, though, all those programs actually do is build a tile list which is a series of data values that represents the number of tiles that need to be displayed at a particular part of the map. Depending on what your preferred tile/map system is, it could be a byte of data that represents each tile or a word (2 bytes) of data. If you work within a byte of data, that allows you to represent values 0 to 255 per byte and therefore restricts you to 256 different tile images within your map. If you work with two bytes per tile, then you can represent values 0 to 65,535; but of course, your map data takes twice the space.
This data would normally be stored within a databank in STOS. We could do the same; however, we are going to keep things simple in our game for now and just use an array like we have seen before. An array is essentially the same as a databank in that it’s data in memory; we just access it differently. We’ll get to this bit in our next episode, so for now we are just going to set the data and read it without storing it.
But how do we set up this data? Well, it’s quite simple, really. We use the RESTORE command along with the DATA and READ commands.
RESTORE
This instruction changes the line number at which a subsequent READ operation will expect to find the next DATA statement.
– STOS Basic User Manual, Page 226/227.
DATA
The DATA statement allows you to incorporate lists of useful data directly inside a Basic program. This data can be loaded into a variable using the READ instruction.
– STOS Basic User Manual, Page 225/226.
READ
READ allows you to input some data stored in a DATA statement into a list of variables. It starts off with the first data statement in the program, and then reads each subsequent item of data in turn. As you might expect, the variable used in each READ instruction must always be of the same type as the information stored in the current DATA statement.
– STOS Basic User Manual, Page 226.
So what are we going to store in our data? The answer to that is quite easy too; we’re simply going to hold the tile numbers that we need to display on the screen to make our level look correct. In our case, our tile numbers will also be the sprite/image number from our sprite bank. That makes things nice and easy. We’re also going to hold some other information that saves us time and CPU usage when we come to use our game map.
So, let’s create our data statements to hold our level data.
@LevelData
data "Central Cavern"
data 23,00,00,00,00,00,00,00,00,33,00,35,00,00,00,00,35,00,00,00,00,00,00,00,00,00,00,00,00,33,00,23
data 23,00,00,00,00,00,00,00,00,00,00,00,00,00,00,00,33,00,00,00,00,00,00,00,00,00,00,00,00,00,00,23
data 23,00,00,00,00,00,00,00,00,00,00,00,00,00,00,00,00,00,00,00,00,00,00,00,00,00,00,00,00,00,00,23
data 23,00,00,00,00,00,00,00,00,00,00,00,00,00,00,00,00,00,00,00,00,00,00,00,00,00,00,00,00,00,00,23
data 23,00,00,00,00,00,00,00,00,00,00,00,00,00,00,00,00,00,00,00,00,00,00,34,33,00,00,34,00,00,00,23
data 23,24,24,24,24,24,24,24,24,24,24,24,24,24,25,25,25,25,24,25,25,25,25,24,24,24,24,24,24,24,24,23
data 23,00,00,00,00,00,00,00,00,00,00,00,00,00,00,00,00,00,00,00,00,00,00,00,00,00,00,00,00,00,33,23
data 23,24,24,24,00,00,00,00,00,00,00,00,00,00,00,00,00,00,00,00,00,00,00,00,00,00,00,00,00,00,00,23
data 23,00,00,00,00,00,00,00,00,00,00,00,00,00,00,00,00,23,23,23,00,34,00,00,00,00,00,00,00,00,00,23
data 23,24,24,24,24,00,00,00,29,29,29,29,29,29,29,29,29,29,29,29,29,29,29,29,29,29,29,29,00,00,00,23
data 23,00,00,00,00,00,00,00,00,00,00,00,00,00,00,00,00,00,00,00,00,00,00,00,00,00,00,00,00,24,24,23
data 23,00,00,00,00,00,00,00,00,00,00,00,00,00,00,00,00,00,00,00,00,00,00,00,00,00,00,00,00,00,00,23
data 23,00,00,00,00,00,00,00,00,00,00,00,34,00,00,00,00,00,00,00,23,23,23,25,25,25,25,25,24,24,24,23
data 23,00,00,00,00,24,24,24,24,24,24,24,24,24,24,24,24,24,24,24,00,00,00,00,00,00,00,00,00,00,00,23
data 23,00,00,00,00,00,00,00,00,00,00,00,00,00,00,00,00,00,00,00,00,00,00,00,00,00,00,00,00,00,00,23
data 23,24,24,24,24,24,24,24,24,24,24,24,24,24,24,24,24,24,24,24,24,24,24,24,24,24,24,24,24,24,24,23
data 19,19,19,19,19,19,19,19,19,19,19,19,19,19,19,19,19,19,19,19,19,19,19,19,19,19,19,19,19,19,19,19
data 12,12,12,12,12,12,12,12,12,12,16,16,16,16,16,16,16,16,16,16,16,16,16,16,16,16,16,16,16,16,16,16
As you can see, it looks a little meaningless in this form, but it does represent the layout of Central Cavern – honest! It also looks a bit messy in the code section above, but it will all look much better in the VS Code environment once you have it in there.
You’ll also notice that I’m including the name of the level in there too. That will become clear soon enough.
Generating the Level
Now that our data is entered into STOS, we can start to use it. So we need to put in place the code that reads the data, starting at the top left of the screen, working our way across the screen for 32 tiles, and then down to the next line until we reach the bottom of the screen. We will do this with a simple FOR/NEXT loop. Let’s create our code to do that.
@MakeLevel
    restore
    read levnm$
    for ypos = 0 to 17 : for xpos = 0 to 31
        txpos = (xpos * 8) + SXOFFSET
        typos = (ypos * 8) + SYOFFSET
        read spn : if spn > 0 then sprite 1,txpos,typos,spn : put sprite 1 : wait vbl
    next xpos : next ypos

    paper 12 : pen 0 : locate 0,16 : centre levnm$
    paper 5 : pen 15 : locate 4,17 : print "AIR"
    ink 15 : bar 64,138 to 287,141
    return
Let’s explain what is going on here, shall we?
| Command | Description |
|---|---|
| RESTORE | As per the explanation above, what we are doing here is telling STOS to restore a particular DATA statement so we can begin reading our data. Normally what we would do here is specify the line number, but while I was writing this tutorial, I noticed that there was a slight bug in the VS Code transpiler to STOS in which it translates the line number exactly to the label. When this happens, the RESTORE command fails as the line contains the label text and not data. Oooopsy! I will get that fixed in the near future. Anyway, by not specifying a line number, it resets STOS to expecting the first DATA statement, which in our case works in our favour! |
| READ levnm$ | This command reads the first bit of data; in our case, it is the name of the level. Because we specify this as a string, STOS will read the content of the data held within quotation marks as the entire string. In the background, STOS will be null-terminating the string, and so we effectively read a stream of data until that null value is reached. |
| FOR ypos = 0 TO 17 : FOR xpos = 0 TO 31 | We’ve seen FOR/NEXT loops already, so I’m not going to go into the details here on this one. We’re reading 18 lines of y position data and 32 blocks of x position data. These loops allow us to start at the top left of the screen, working our way across and down, starting from the left again when a new line is reached. |
| txpos = (xpos * 8) + SXOFFSET | Here we are creating a temporary x position on the screen by using the xpos variable, multiplying it by 8 to get the appropriate pixel position, and then adding the SXOFFSET variable that we previously created in order to centre the ZX Spectrum screen on the ST. |
| typos = (ypos * 8) + SYOFFSET | We do the same for the y position. |
| READ spn | Now we read the sprite number (spn) from the data set. This will also move the data pointer to the next value within the DATA instruction. |
| IF spn > 0 THEN | We only want to do the next set of commands when spn is greater than zero. Zero represents when there is no sprite, and therefore is just a transparent background. |
| SPRITE 1,txpos,typos,spn | We’ve already seen the SPRITE command in use when we are displaying Miner Willy. So this is just the same, and instead of changing the animation frame of Willy, we’re changing the animation frame to that of the tile we want to display. |
| PUT SPRITE 1 | Now we tell STOS to put, splat (or podge) the sprite 1 image onto the background. Thus stamping into the screen. |
| WAIT VBL | Interesting. Why are we using a WAIT VBL command at the end of all this? Well, take it out and run it to see what happens – it’s a mess! PUT SPRITE only appears to work when using a WAIT VBL command. Presumably this is because the sprite functionality in STOS is running on an interrupt that is linked to the vertical blank (every 50th or 60th of a second depending on PAL or NTSC), and when you do things en masse like we’re doing here, it’s running quicker than the sprite interrupt. So we put this WAIT VBL here to make sure we’re on time and the PUT SPRITE doesn’t mess up. We could also use the UPDATE instruction; however, I still get odd results when doing this. So we’ll stick with WAIT VBL for now. |
| NEXT xpos : NEXT ypos | Finish the FOR/NEXT loop. |
| PAPER 12 : PEN 0 : LOCATE 0,16 : CENTRE levnm$ | A few little text instructions here for us to digest. PAPER sets the background colour of the text that we want to display. PEN sets the foreground colour of the text that we want to display. LOCATE moves the cursor to the specified 8×8 text position on the screen based on the x position and y position specified. Here we are moving the cursor to x=0 and y=16. CENTRE tells STOS to print the text levnm$ centred at the position last specified in the LOCATE instruction. Note that this is not a pixel-perfect centre, it is based on the 8×8 character grid. Here we are printing the name of the level centred on the screen. |
| PAPER 5 : PEN 15 : LOCATE 4,17 : PRINT “AIR” | As with the above, we are printing on the screen, this time at positions 4,17 and simply printing the word “AIR” starting at that location rather than centering the text. |
| INK 15 : BAR 64,138 to 287,141 | INK sets the colour that any shape drawing or plotting operation will use as it’s colour. BAR draws a solid/filled rectangle from xpos,ypos to xpos2,ypos2, which represents the top-left and bottom-right of the rectangle. |
Finally, we need to add a call to our subroutine to make the level draw.
gosub @LoadAssets
gosub @MakeLevel
end
If you run the routine now, you should get something like the following:
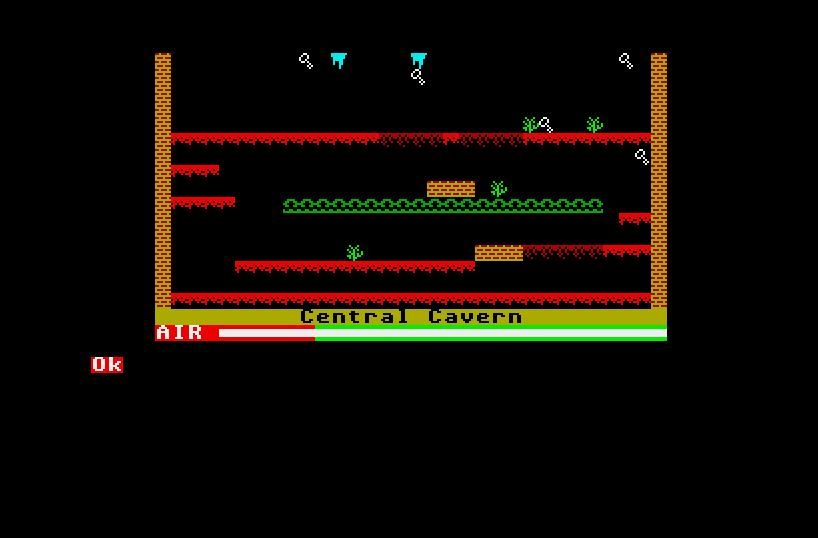
A nice rendition of the Central Cavern. Whoop whoop!
Hang On! Why are we drawing the air at maximum? Shouldn’t we do that during our game loop? Well, that is a very, very good question. We could do that, but remember, drawing things to the screen takes CPU time, so the idea is to draw as little information as possible per frame. If we draw a white box from X,Y to X2,Y2 every frame, that’s a lot of drawing that needs to be done, and we all know that STOS is very slow when drawing things like that. Therefore, if we draw the entire air time that is left, our game loop simply needs to draw a single 4 pixel line each time the air changes. This will be done in the appropriate colour, either green or red, moving from right to left. That is much faster than drawing a filled rectangle for each frame – yay!
Save the Level Screen
The final thing we now need to do is save the level screen so that it can be loaded into our main game loop. This bit is really easy to do:
gosub @LoadAssets
gosub @MakeLevel
save "LEVEL01.PI1",physic
end
And there we have it. We’ve generated our level map and saved it as an image so that we can use it in our main game loop.
And so, we’ve reached the end of another exciting episode of Let’s Remake Manic Miner. As always, the source files can be found in the GitHub repository.
In our next episode, we will start to look at how to integrate our environment into our main game loop. Until then… Happy STOSing.
[…] all we need to do is transpose the data we created in episode six into the tile representations above. Let’s add the tile map to our source code and read it […]