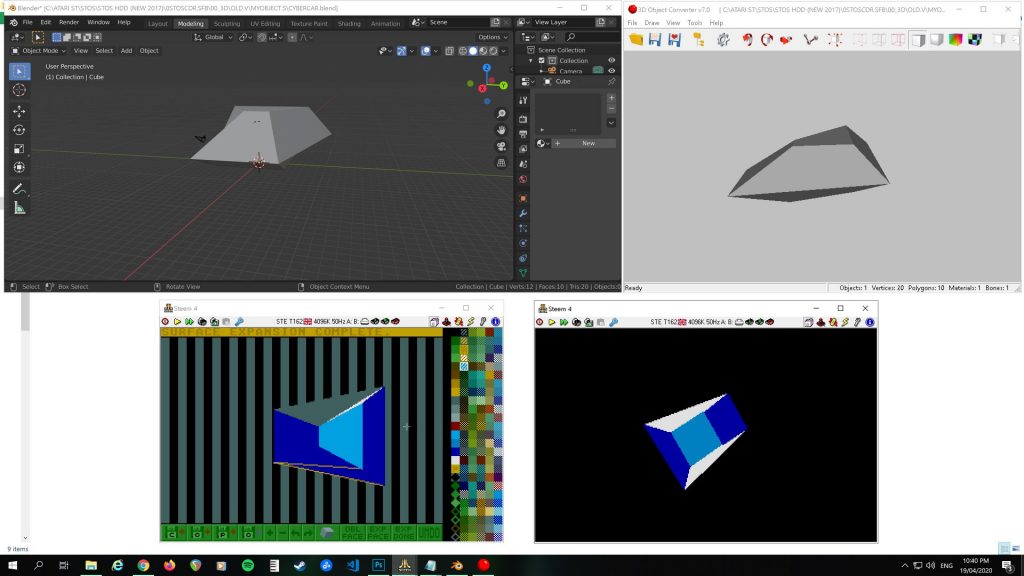
I thought it would be a good idea to include this additional information I posted up to the STOS Coders FB page. It’s to help those who want to make new models for DML’s 3D extension. A JPG screenshot has been included, showing a possible workflow in action.
I’d advise not using The Pixel Twin’s Utility Disk version that’s floating around in Floppyshop PDL (ie. UTL-3242.zip). It seems to be an earlier 1991 version and somewhat incomplete, so please use the later 1992 version included within this archive (which Doug posted to Atari Forum in 2014). You can modify the code within DML’s newer example file, STOS3D3.BAS much more easily to view/use your own models now too.
So, I have come up with a workflow that works well so far. I’m keeping my fingers crossed that we can eventually do more than just view a newly created model!
1) Model a low poly model in Blender 3D (https://www.blender.org/)
2) Export as a Wavefront *.OBJ file (you can probably try other formats too, I just used this one because I figured it would work fine and it did)
3) Load the *.OBJ file into 3D Object Converter v7.0 (http://3doc.i3dconverter.com/index.html) (799 3D object file formats supported!)
4) Save as *.3D2 format (Cyber Studio CAD-3D)
5) Load the *.3D2 model file into DML’s “CADCONV.PRG”
6) See DML’s own original doc for further info and get ready to be patient with all of this!
Use the arrow keys to navigate around the model, Z & X keys to cycle through each triangle. Clean up each surface by deleting the first triangle (with “DEL FACE”), then expand the 2nd triangle to make all surfaces appear like your original Blender 3D model. You will have to click on “EXP FACE” a couple of times, sometimes more. Then “EXP DONE” when finished. Recolour all surfaces to your liking. Only use the first 16 colours. If you mess up, reload the *.3D2 file and start again.
7) Click on the floppy disk icon “O” with the arrow pointing towards it, ie. 4th one in. Export a new object file set (*.X, *.Y, *.Z, *.OBJ) to a blank floppy disk image in drive A (not your HDD partition, as I don’t think it can save to HDD). The doc says it saves off a *.S file somewhere, it doesn’t, it’s an *.OBJ file (so remember to keep your original Wavefront *.OBJ files within a seperate folder from your output here, to avoid overwriting!). You just type in the name you want for the whole file set, but no extension required as it saves out 4 new files at once.
8) Modify the example file listing (STOS3D3.BAS), so you can load in your new model and view it. In line 10 you can modify the palette, I think this may need experimenting with to get the colours to match up correctly.
Then on line 46, you can change each filename similar to what I have done here:
46 I(X_LIST)=start(6) : I(Y_LIST)=start(7) : I(Z_LIST)=start(8) : I(S_LIST)=start(9) : I(FIL_PATS)=start(10) : bload “objects\cybercar.x”,start(6) : bload “objects\cybercar.y”,start(7) : bload “objects\cybercar.z”,start(8) : bload “objects\cybercar.obj”,start(9)
It should now display your new model, at least I hope so. Elon Musk won’t be hiring me for my new car design, that’s for sure!
Mike K
ps. Many thanks to Neil Halliday for tracking down The Pixel Twin’s Utility Disk! We were able to include the docs from that disk, with the later version posted to AF which I found later.
DOWNLOAD
For reference, here is an image of the workflow